
Does ISO Affect Exposure?
Have you ever tried shooting a low-light, dimly lit scene? You exposed for the mood that you want, maybe you bumped up the ISO a little bit, but no matter what you do, it always looks noisy to a degree. Then you look at movies like The Social Network or The Batman (just to name 2) and they look freaking clean. It makes you want to throw away your dual native ISO camera because you bought it mainly for its low-light capabilities.
I believe it’s necessary to have a deeper understanding how what ISO actually is and how it affects your exposure.
Does ISO Affect Exposure?
To begin, it’s crucial that we dismiss the notion that ISO directly affects exposure. While it’s true that ISO does have an impact on exposure, the effect isn’t really straightforward. Essentially, ISO affects our judgment of exposure, but it doesn’t alter the amount of light actually hitting the camera sensor. The only two variables that truly dictate how much light will reach the sensor are:
The aperture of the lens
The shutter speed
To make the concept simple: every camera has a sensor, and that sensor captures light and turns it into an electrical charge that is then converted into a digital value. The sensor has a certain dynamic range. A camera applies ISO amplification to the signal after the signal has already been recorded by the sensor. It doesn’t actually alter how much light the sensor received in the first place.
ISO doesn’t really affect exposure, it biases us to expose a certain way.
Audio Recording Analogy
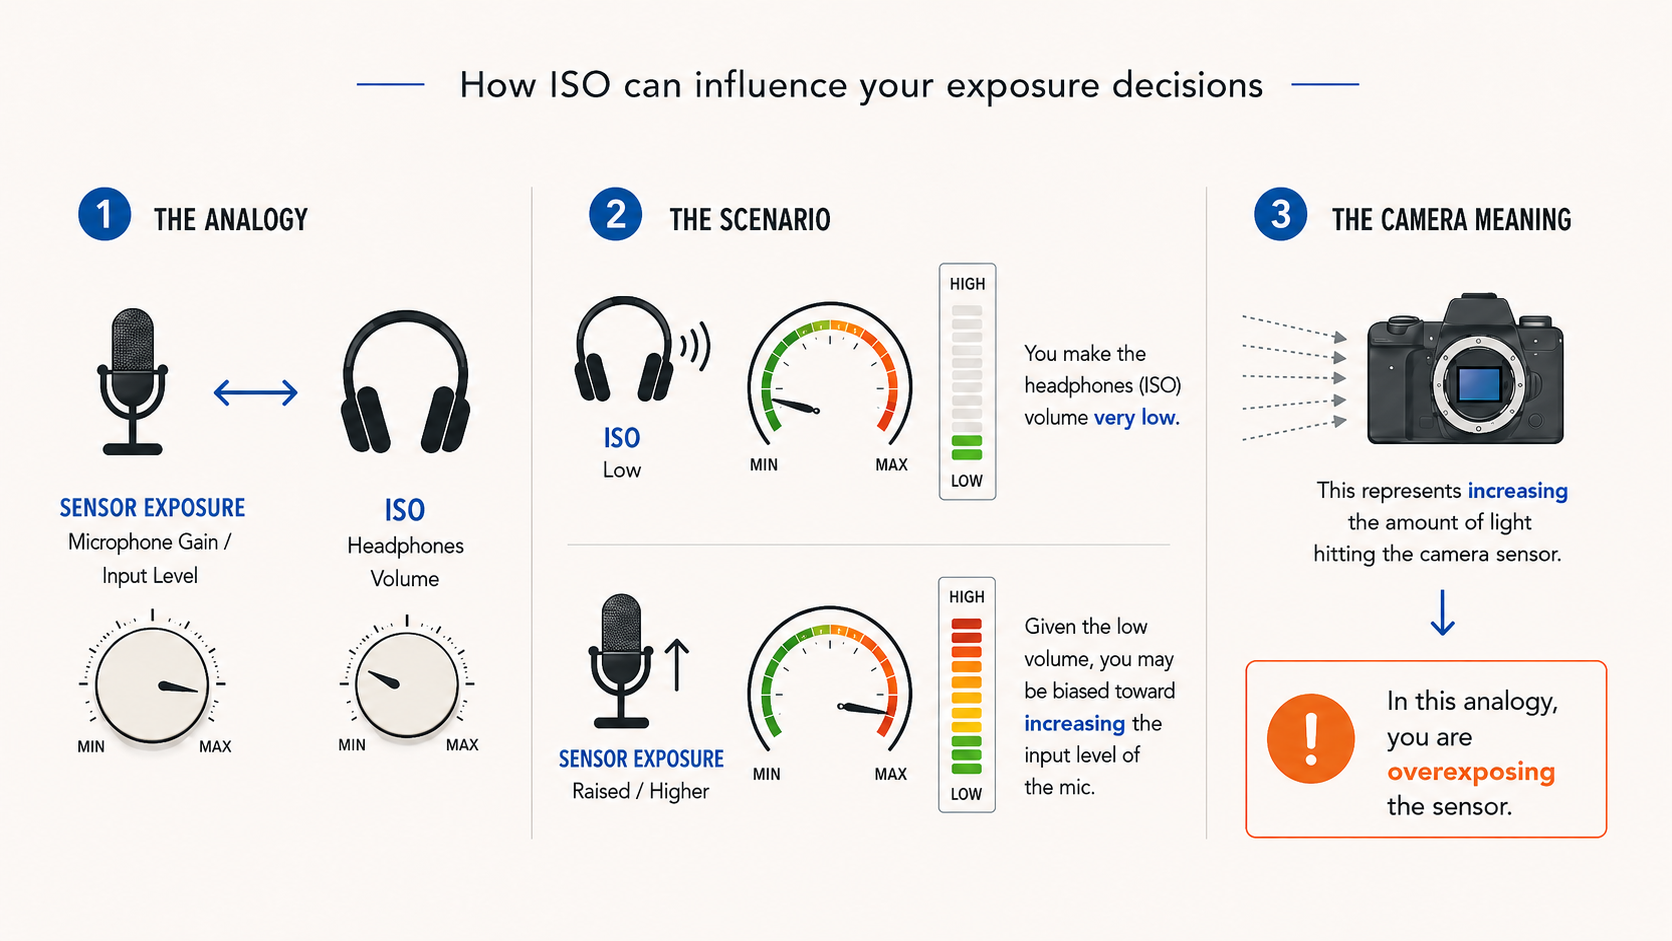
Imagine you are an audio engineer recording a singer. The engineer’s headphones level represents the ISO while the singer’s microphone gain level represent the camera sensor. The interaction between the 2 levels influences how the signal gets recorded.
Scenario 1:
You make the headphones (ISO) volume very loud.
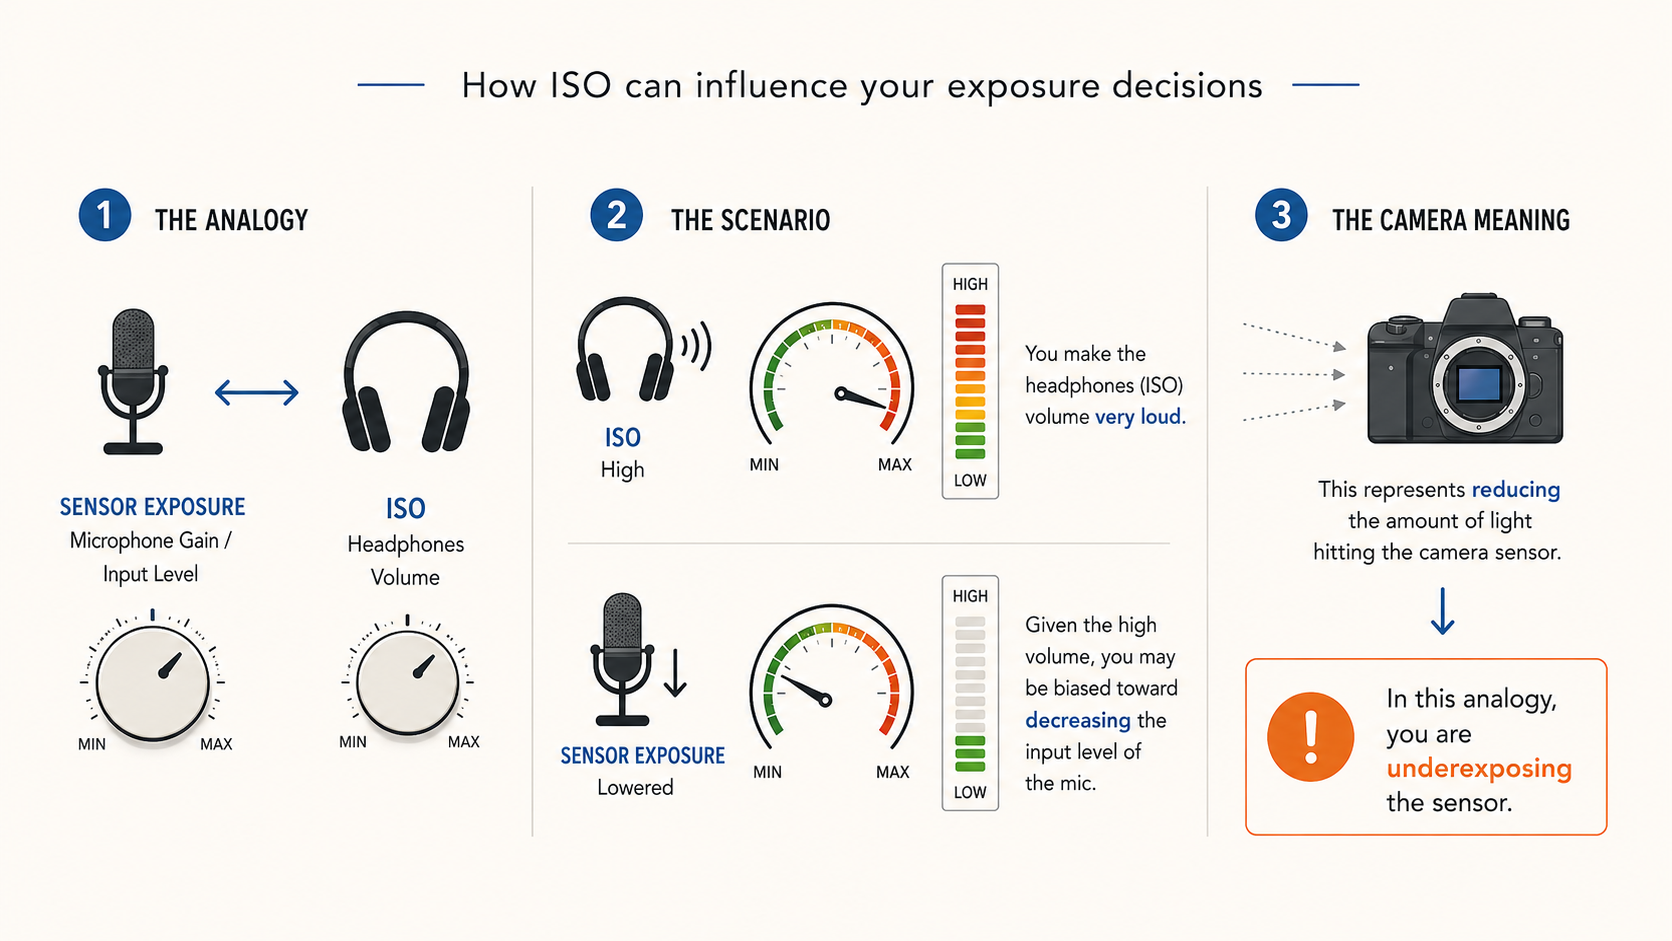
Given the high volume, you may be biased toward decreasing the input level of the mic. That represents reducing the amount of light hitting the camera sensor. In this analogy, you are underexposing the sensor.
Scenario 2:
The opposite is also true. If the volume of the headphones is very low, you’re going to increase the input level of the mic. This recording is at a stronger level, hence overexposing the sensor.
NB: Strictly speaking, talking about “overexposing” or “underexposing” the sensor in the examples above is probably not the most accurate terminology. Overexposure and underexposure are somewhat arbitrary terms. When exactly is something underexposed or overexposed? I’d say an image is overexposed when important details are clipped (not as a creative choice), and underexposed when the image sits too close to the noise floor, resulting in an overall noisy image. A better way to phrase it would be: give the sensor more/less light compared to a baseline reference. Either way…the mechanics don’t change.
Changing the ISO value works like an amplifier. We have a signal and we can either boost it or not, but we are not really changing the amount of signal the sensor captured in the first place.
How To Get A Clean Image
So how do we make dark and moody images cleaner? This is where exposing to the right comes into play. (but that doesn’t mean to aimlessly look at the exposure meter to reach a +1.7 EV value)
Exposing to the right means giving the sensor a healthy amount of light to work with. But after everything we’ve said, it should be clear that if you are exposing to the right by raising the ISO, you’re not really exposing to the right, you’re just boosting the signal.
In fact, by raising the ISO:
You’re not exposing to the right
You’re probably exposing to the left
Film Photography Example
Exposing to the right isn’t a digitally bound practice. If you ever shot film, you probably heard the term thick negative. This is what cinematographers did for years with film: If you had a 500 ISO film stock, you would meter it as if it were ISO 250.
That means you would:
Increase the light levels
Open the iris
Or both
You expose for ISO 250 while actually recording at ISO 500.
So you are constantly and consistently overexposing by exactly one stop. Then, during printing (or in digital, during post-production), you bring the image back down by one stop.
The result:
Cleaner image
Richer image
Lower visible noise
Why? Because lowering the brightness in post, or printing down, also pushes the noise floor down.
This doesn’t mean they didn’t pay attention to contrast ratios in order to achieve the mood they were looking for. In the case of dark scenes, the mood is often dictated by how the brighter elements are placed within the frame, rather than by simply creating a muddy-looking dark image with nowhere for the eye to go.
For this reason, monitoring correctly in the digital domain is extremely helpful when trying to achieve a successful “expose to the right” approach.
Exposure Index to the Rescue
Exposure Index is nothing more and nothing less than your camera giving you a photometrically brighter or darker preview of the image while still recording at the sensor’s native ISO. Let’s take a base ISO of 800 as an example. An EI of 400 would make you see the image as if you were recording at ISO 400, while the camera is still actually recording at ISO 800. This allows you to consistently expose one stop brighter, giving the sensor a healthy amount of light, while still seeing a correct preview of the final look. That, in turn, allows you to make informed decisions when lighting the scene.
The Core Concept
To get a clean image, especially for moody shots, you should actually have more light on the scene. The Catch: At lower ISO level/Exposure Index the highlights clips “faster”
Why Do Highlights Clip Faster?
Go back to the singer analogy.
If the headphone level (ISO) is high:
You reduce the mic input
You get more headroom before clipping
If the headphone level is low:
You raise the mic input
The signal gets closer to clipping
The same thing happens with a camera sensor.
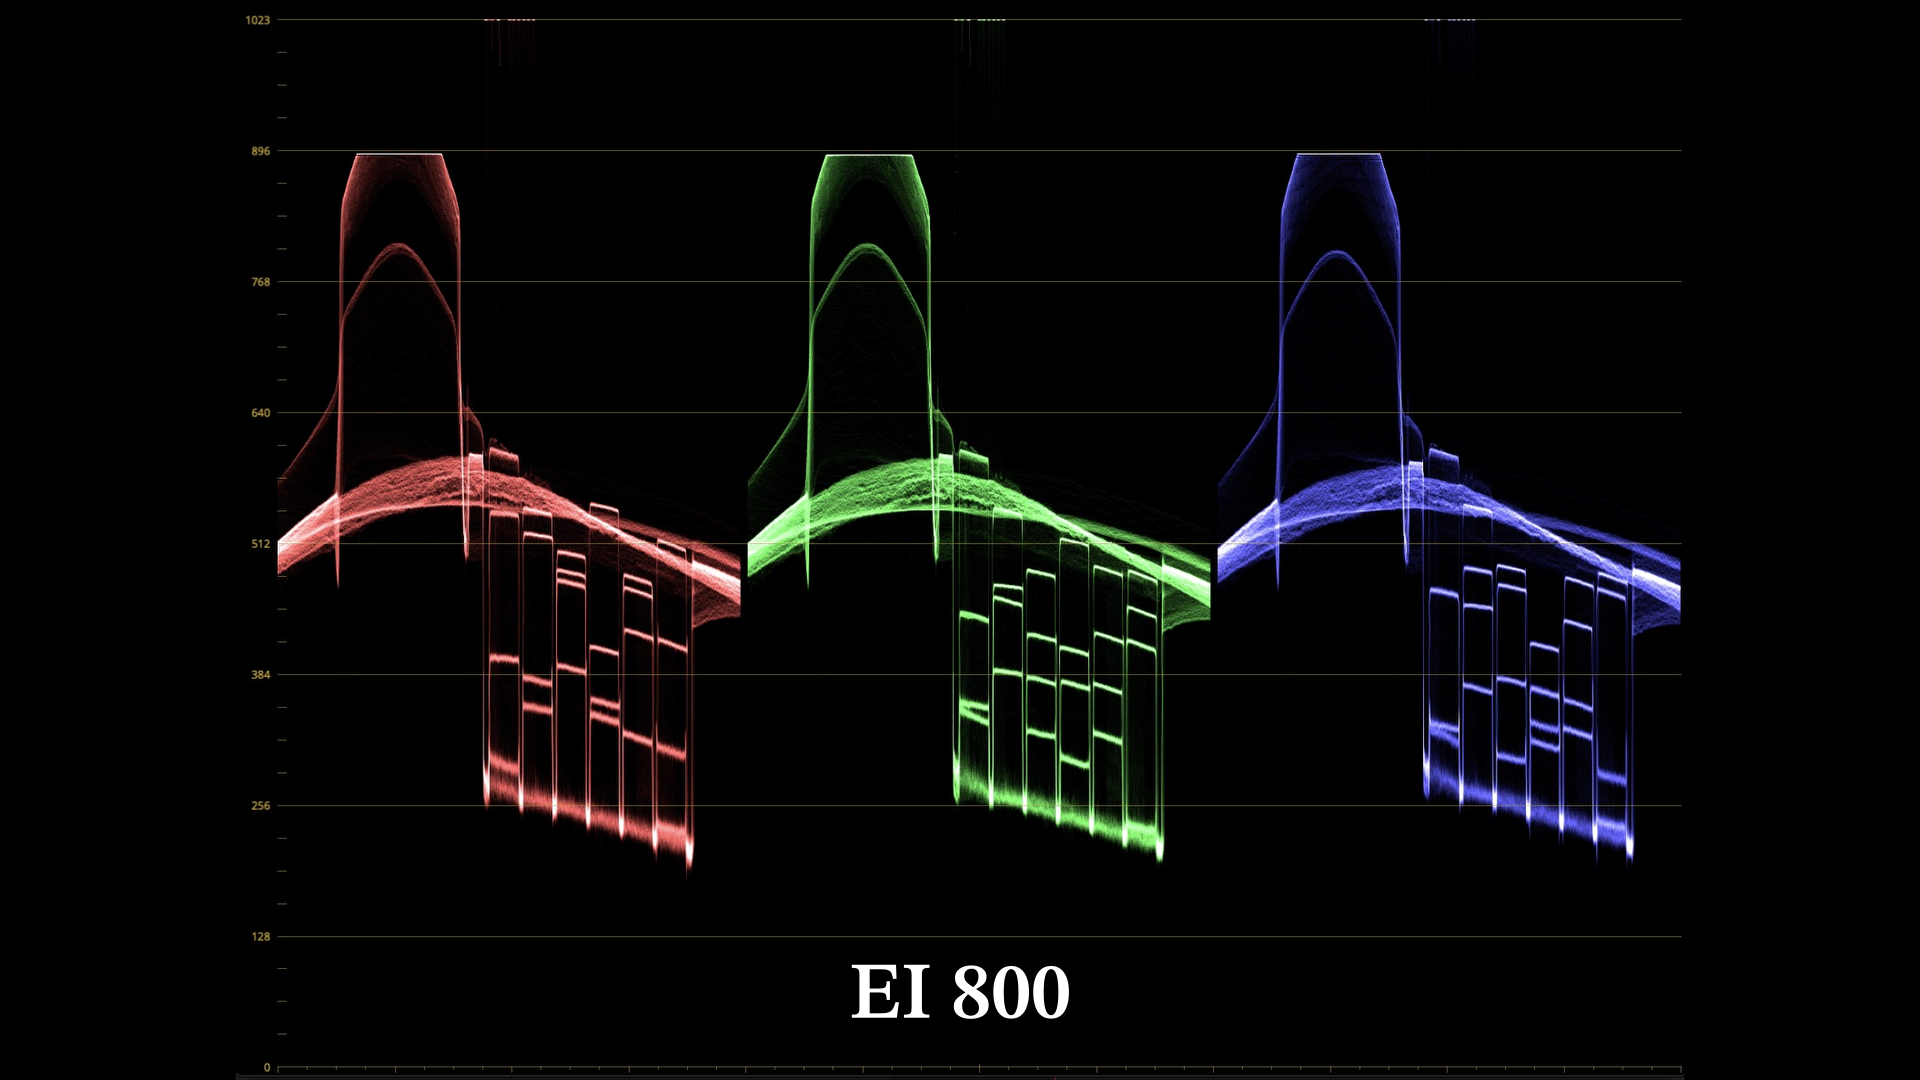
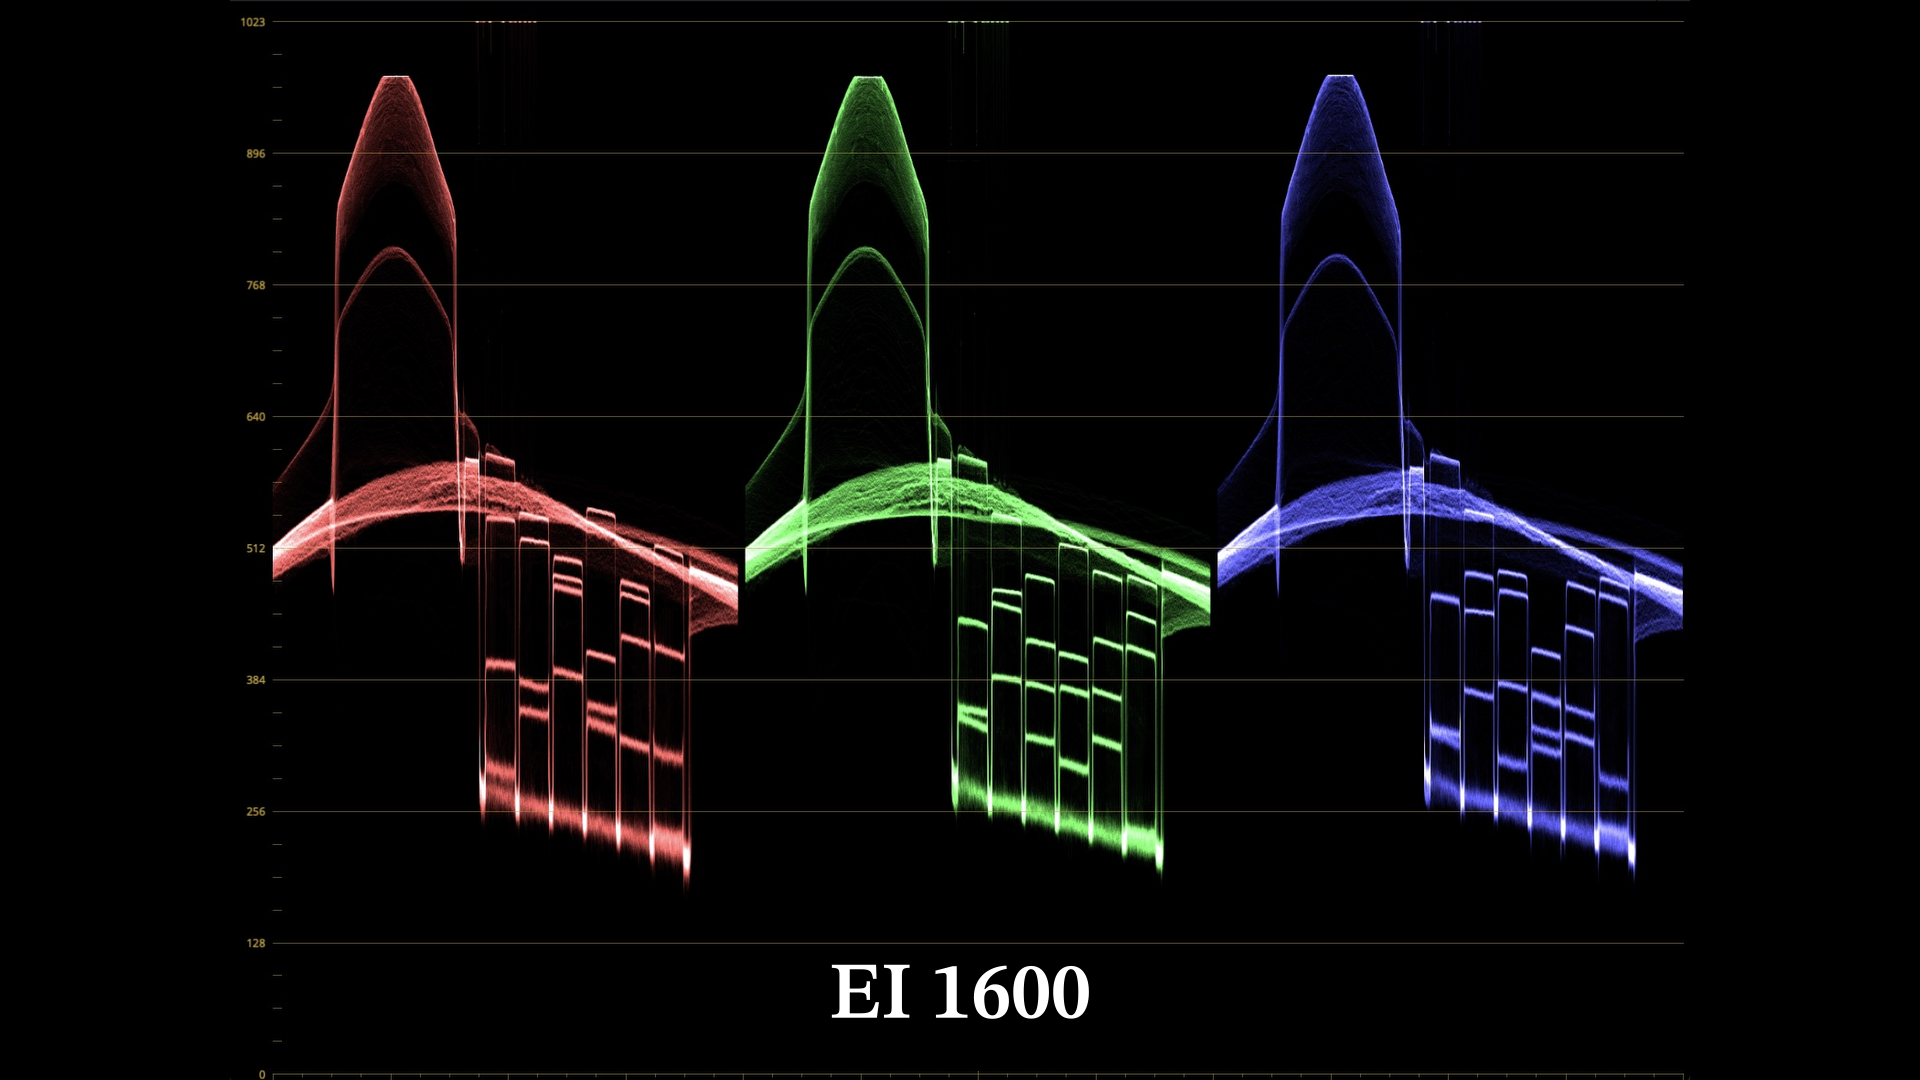
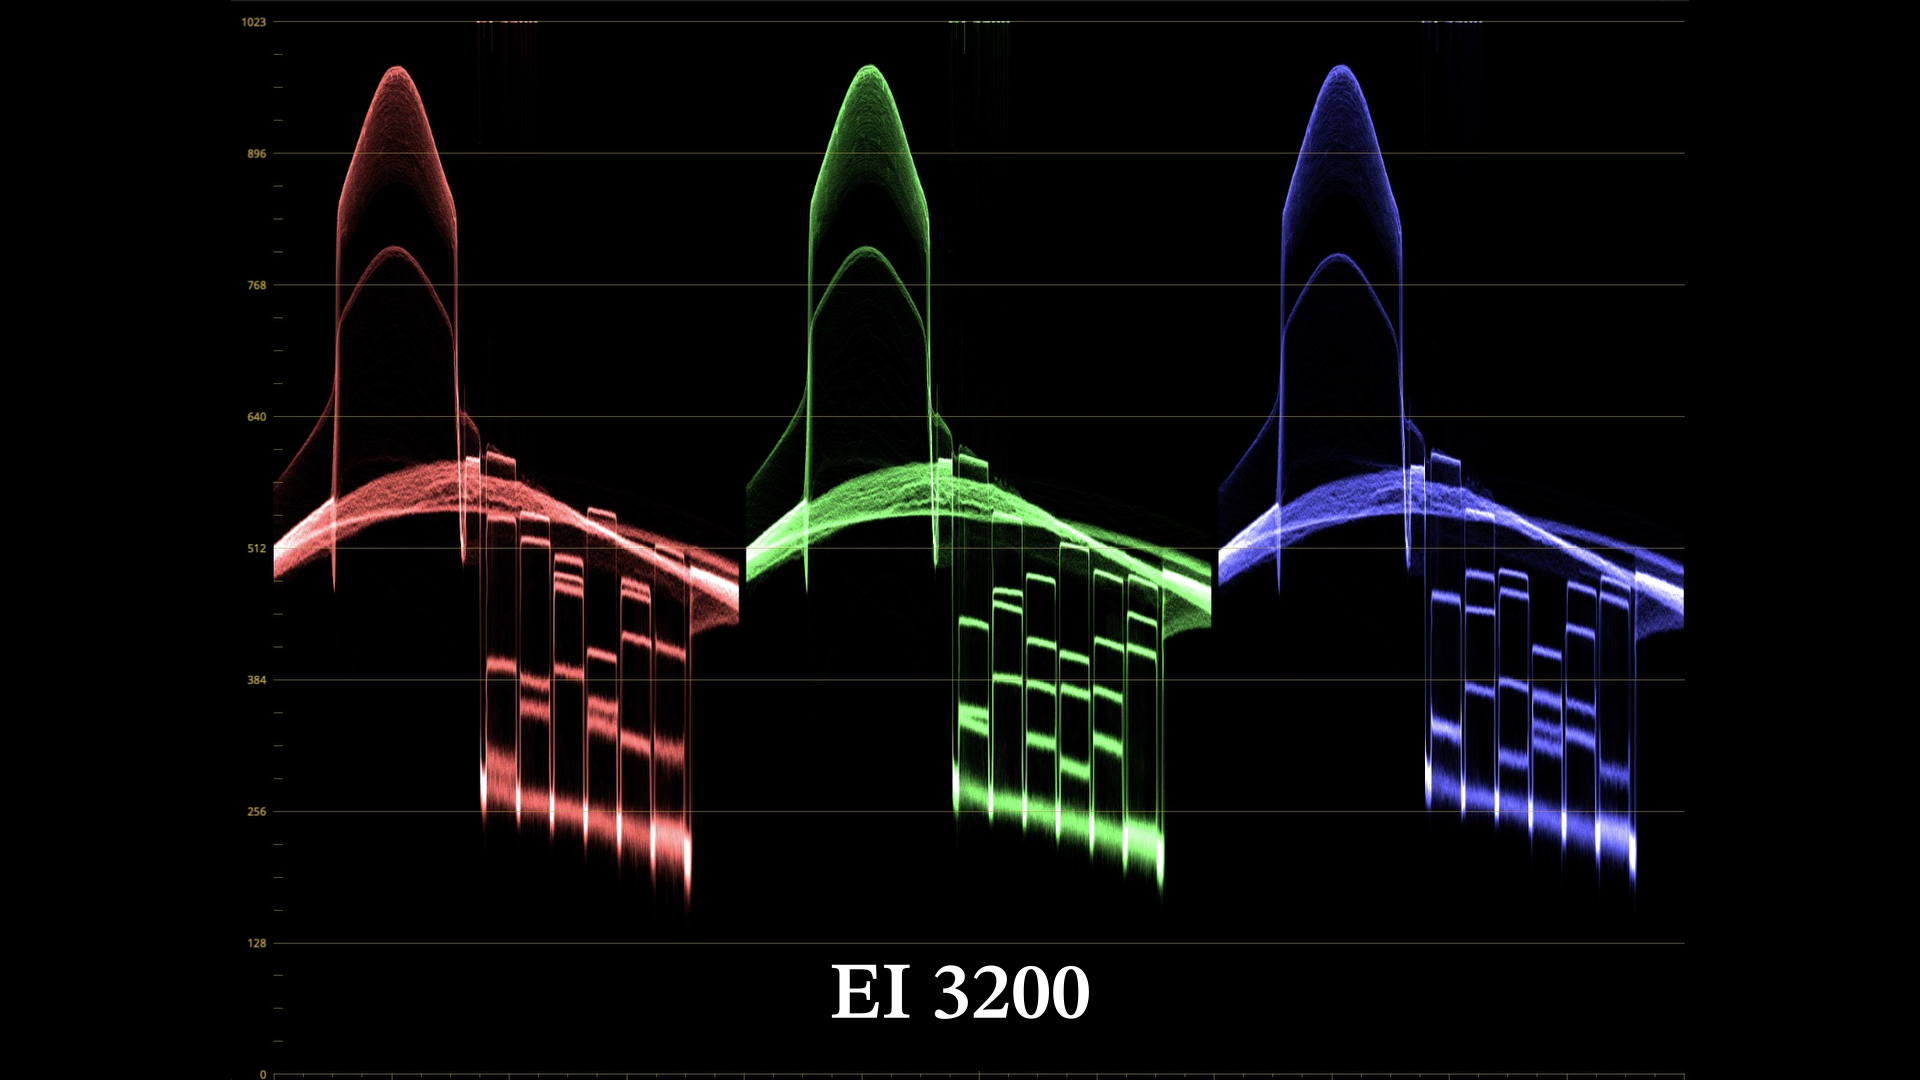
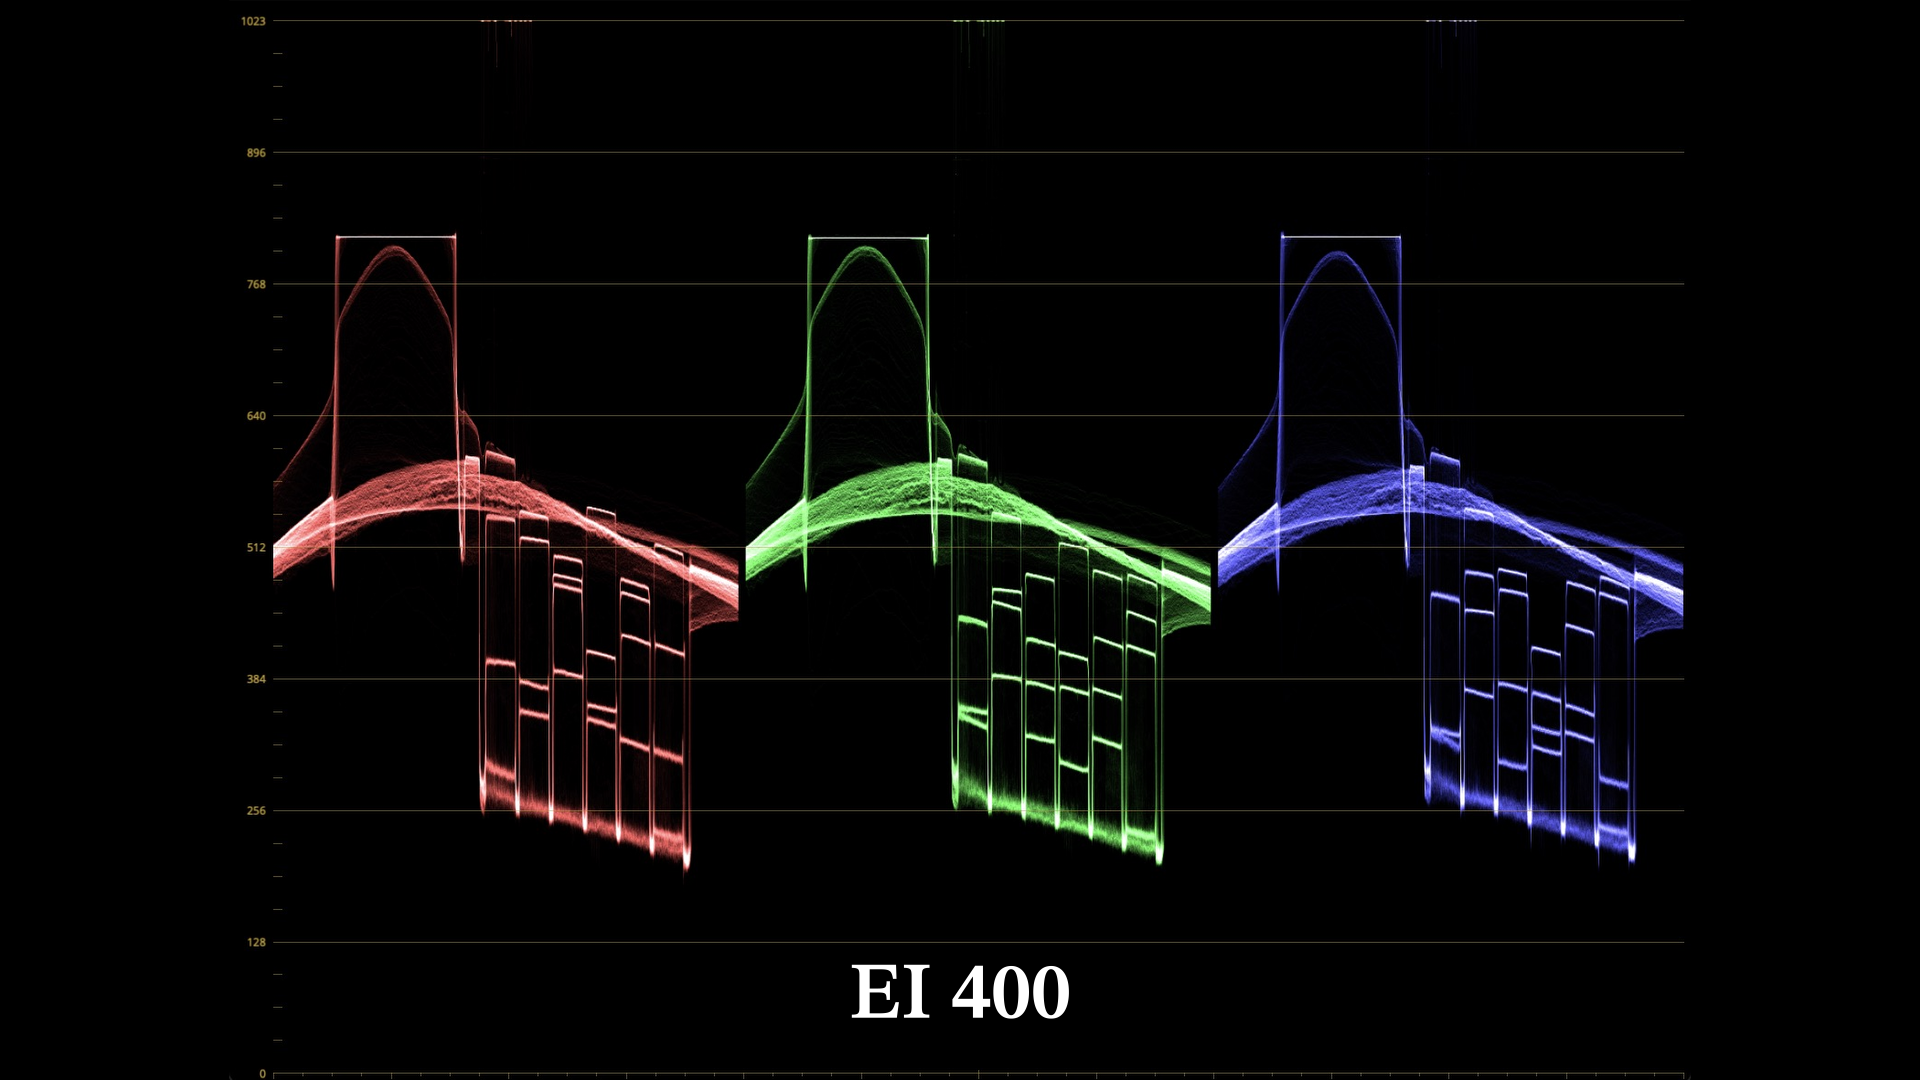
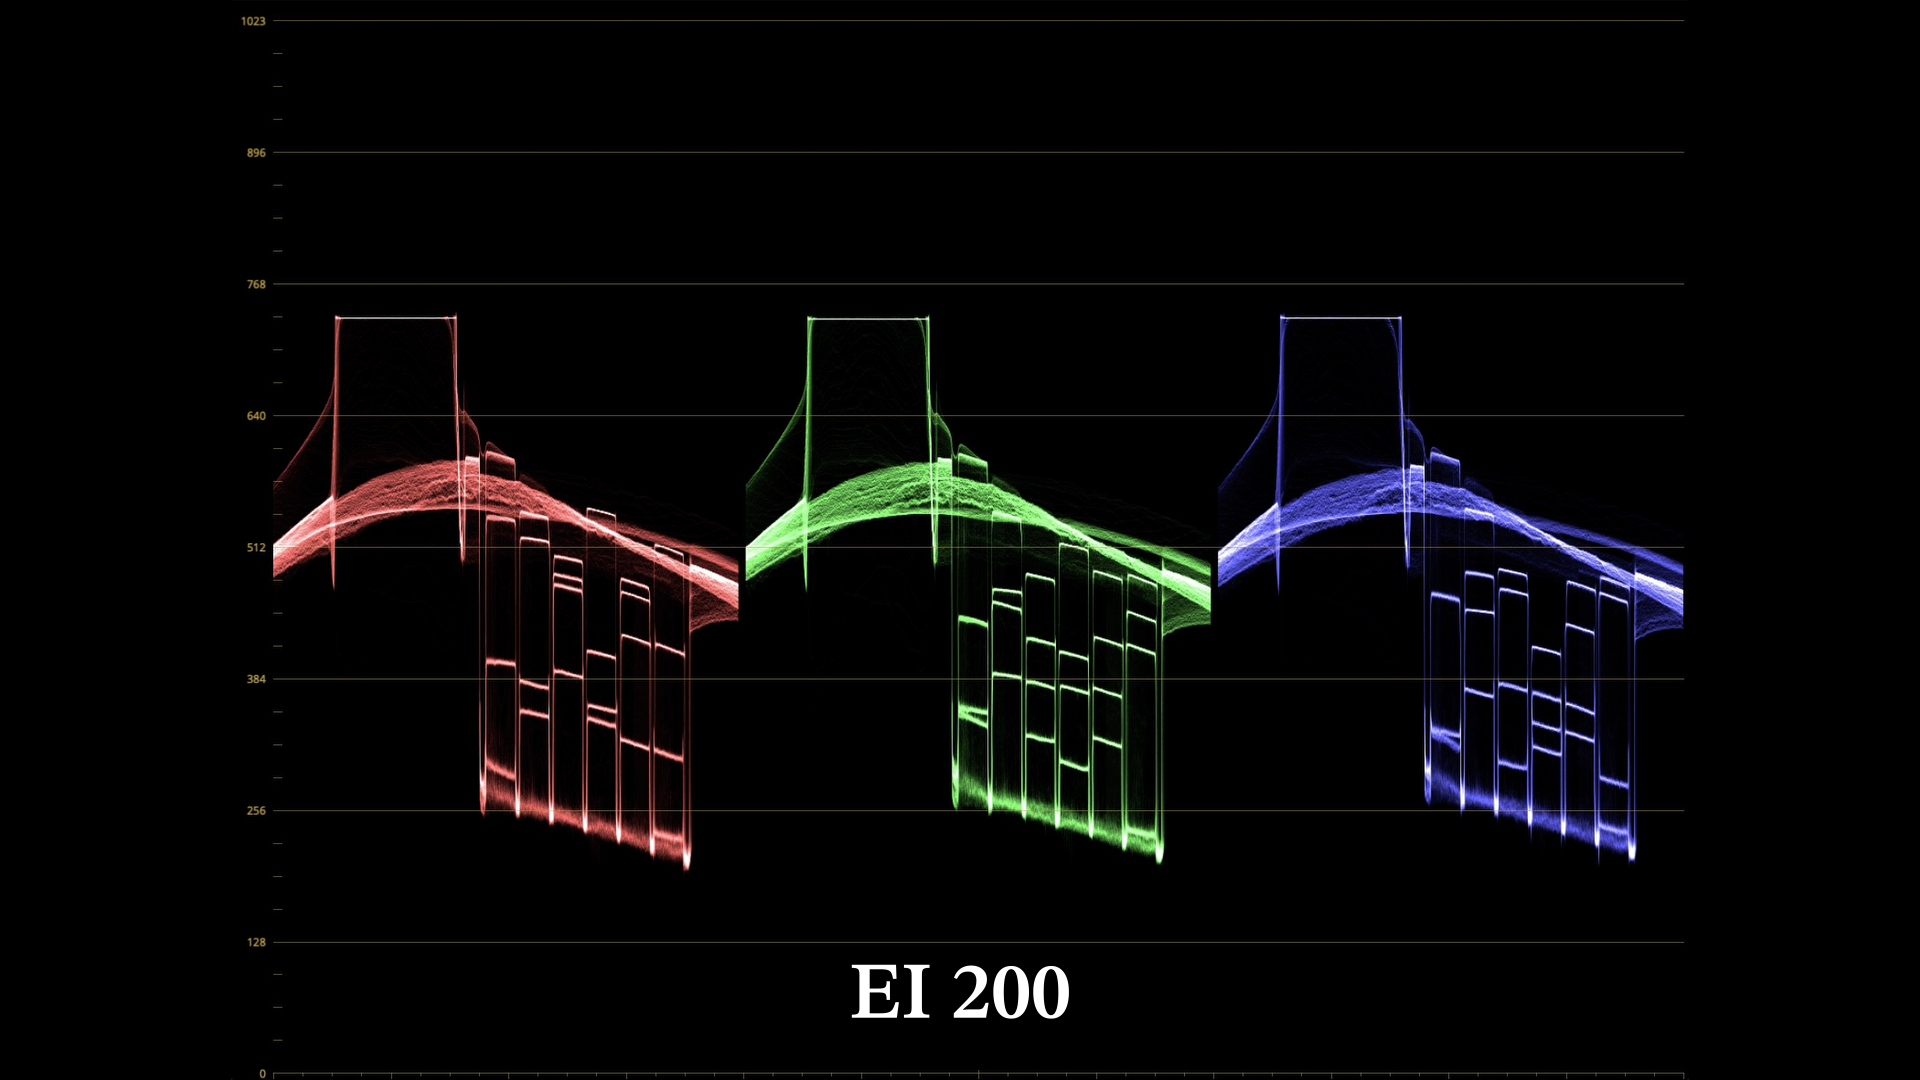
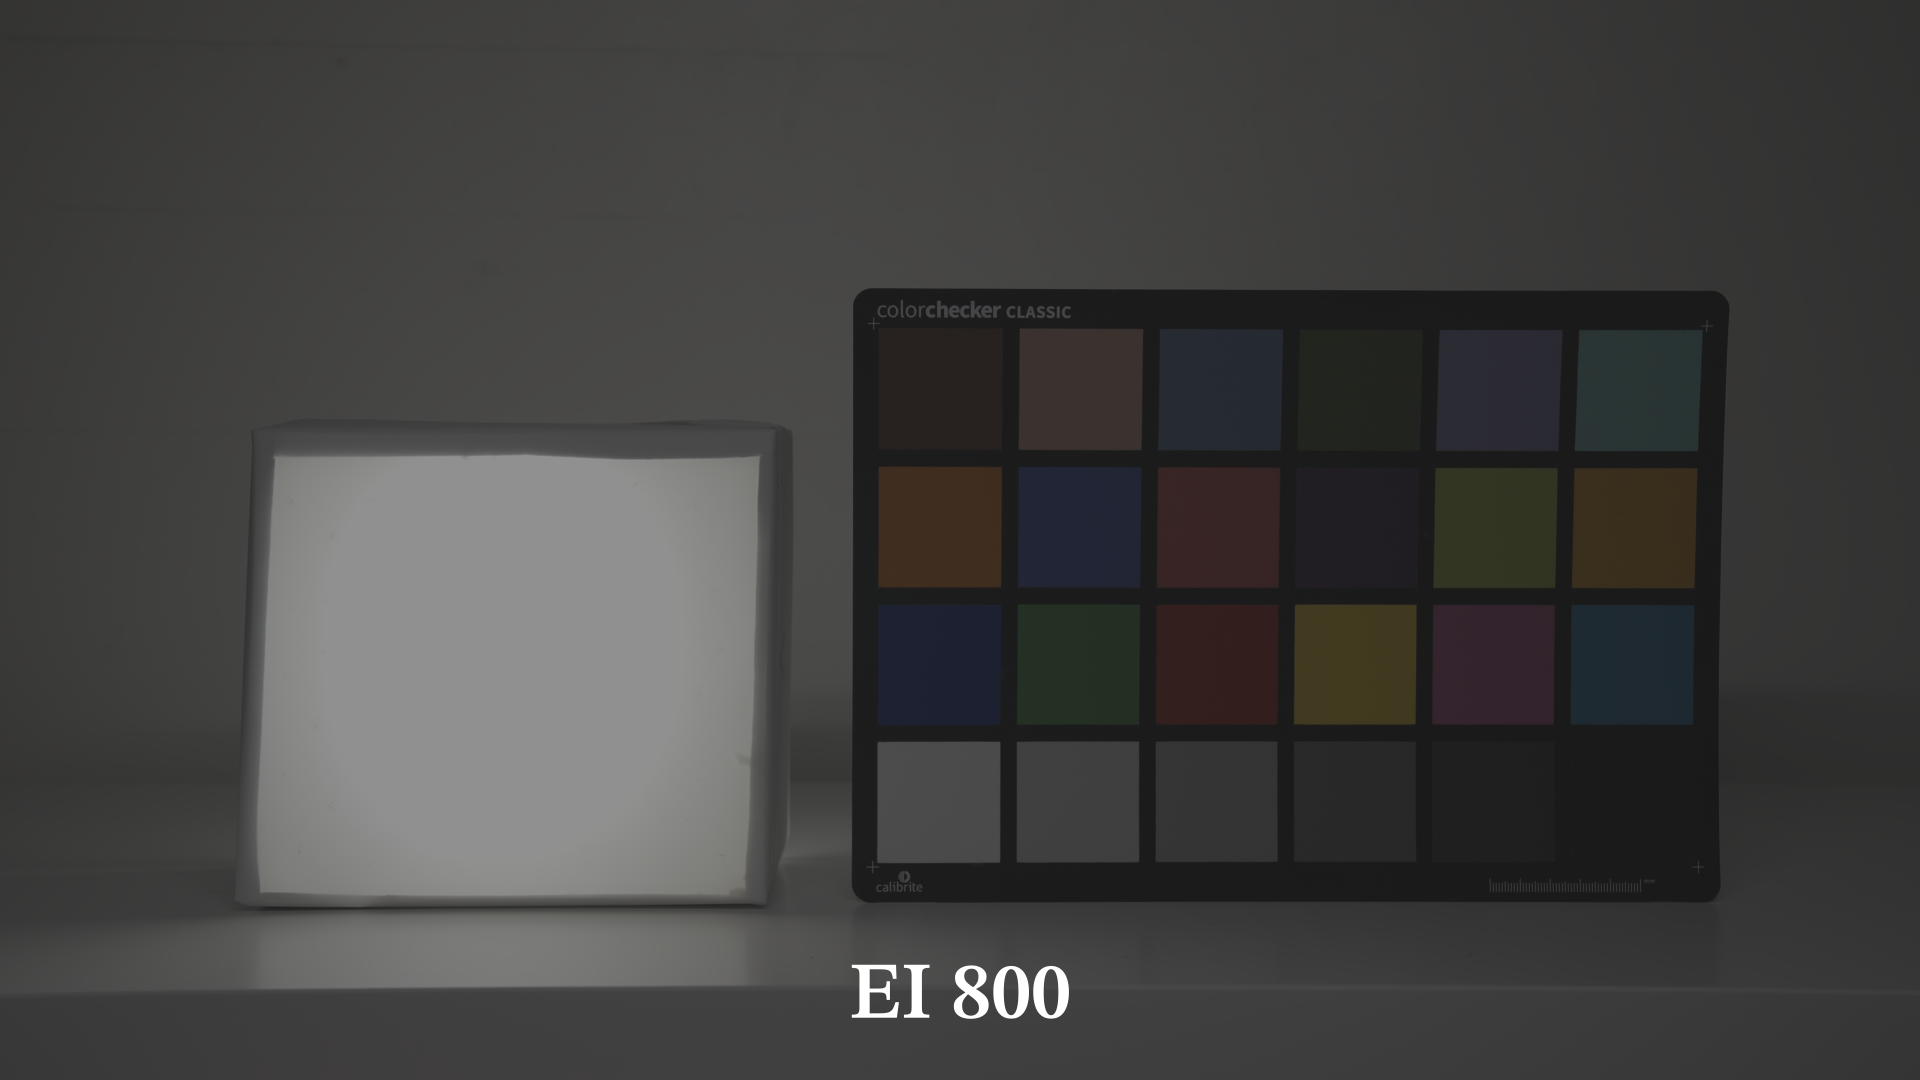
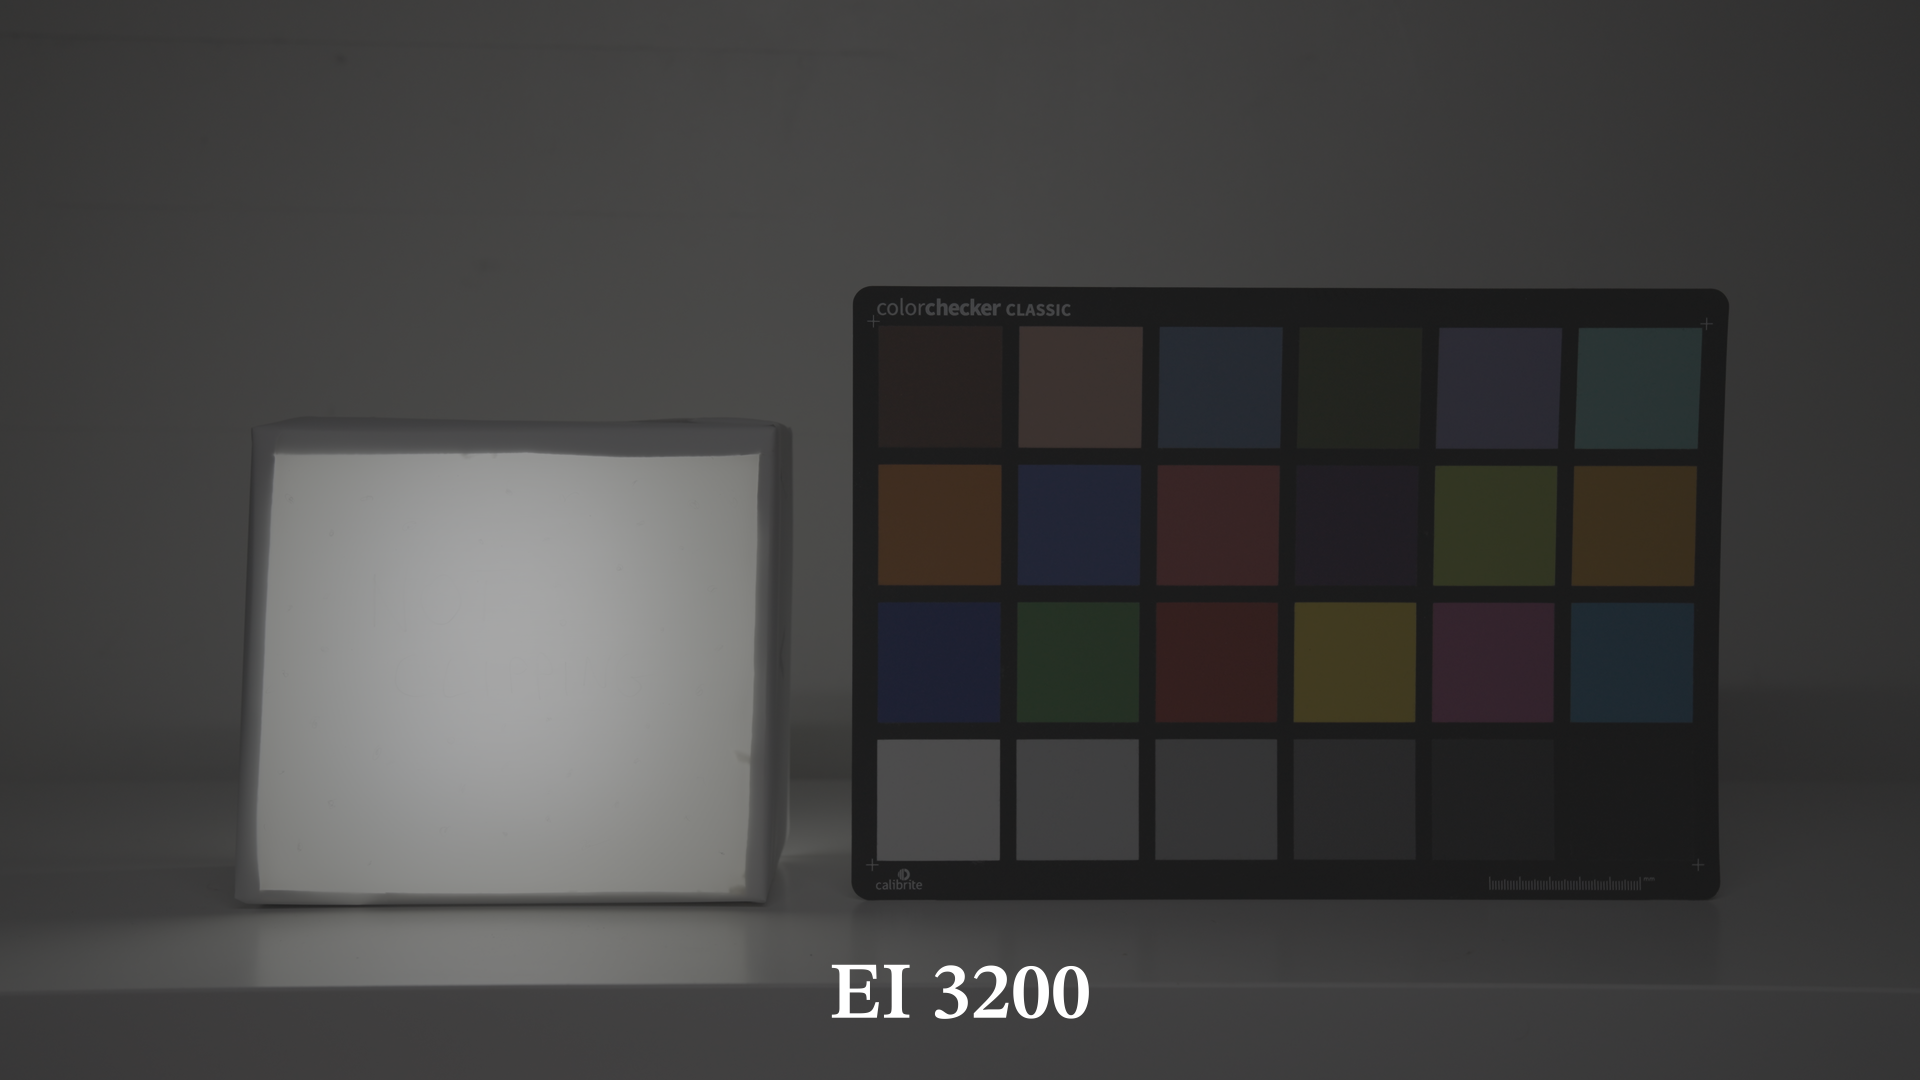
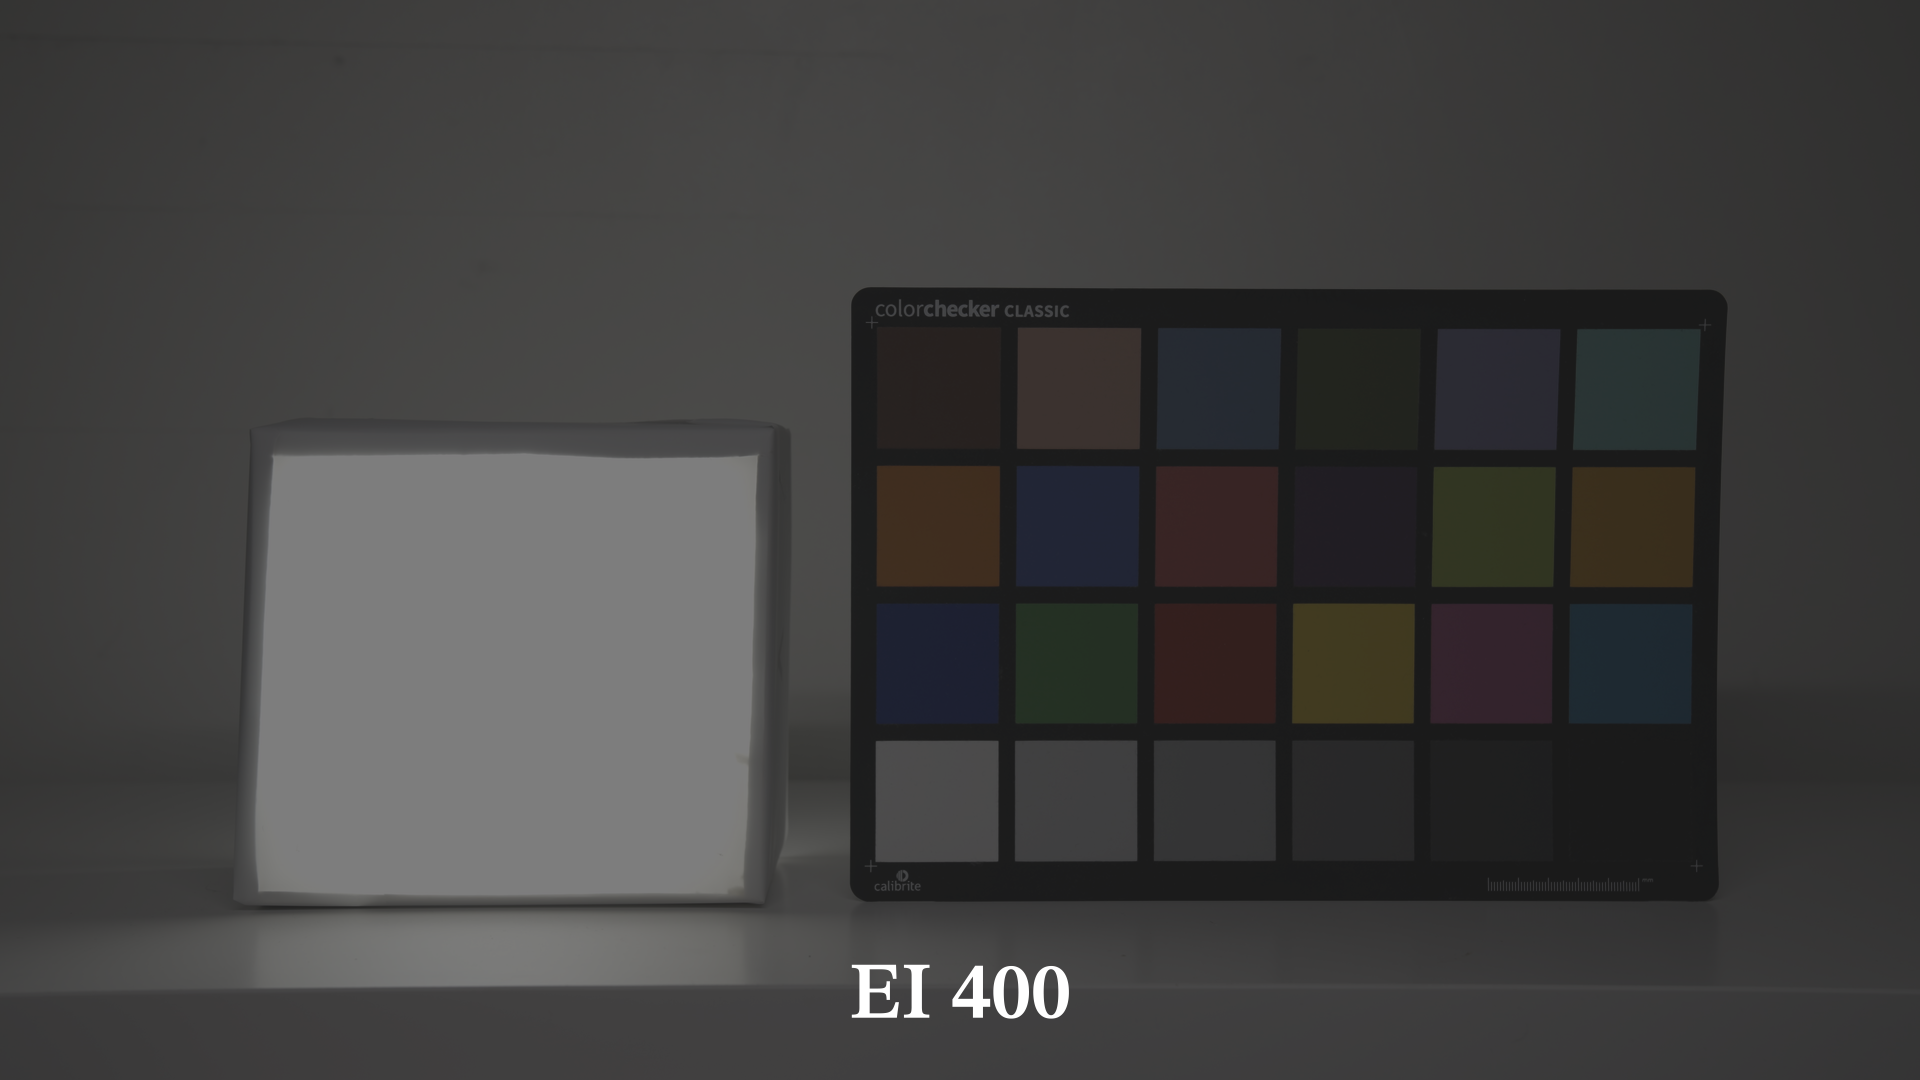
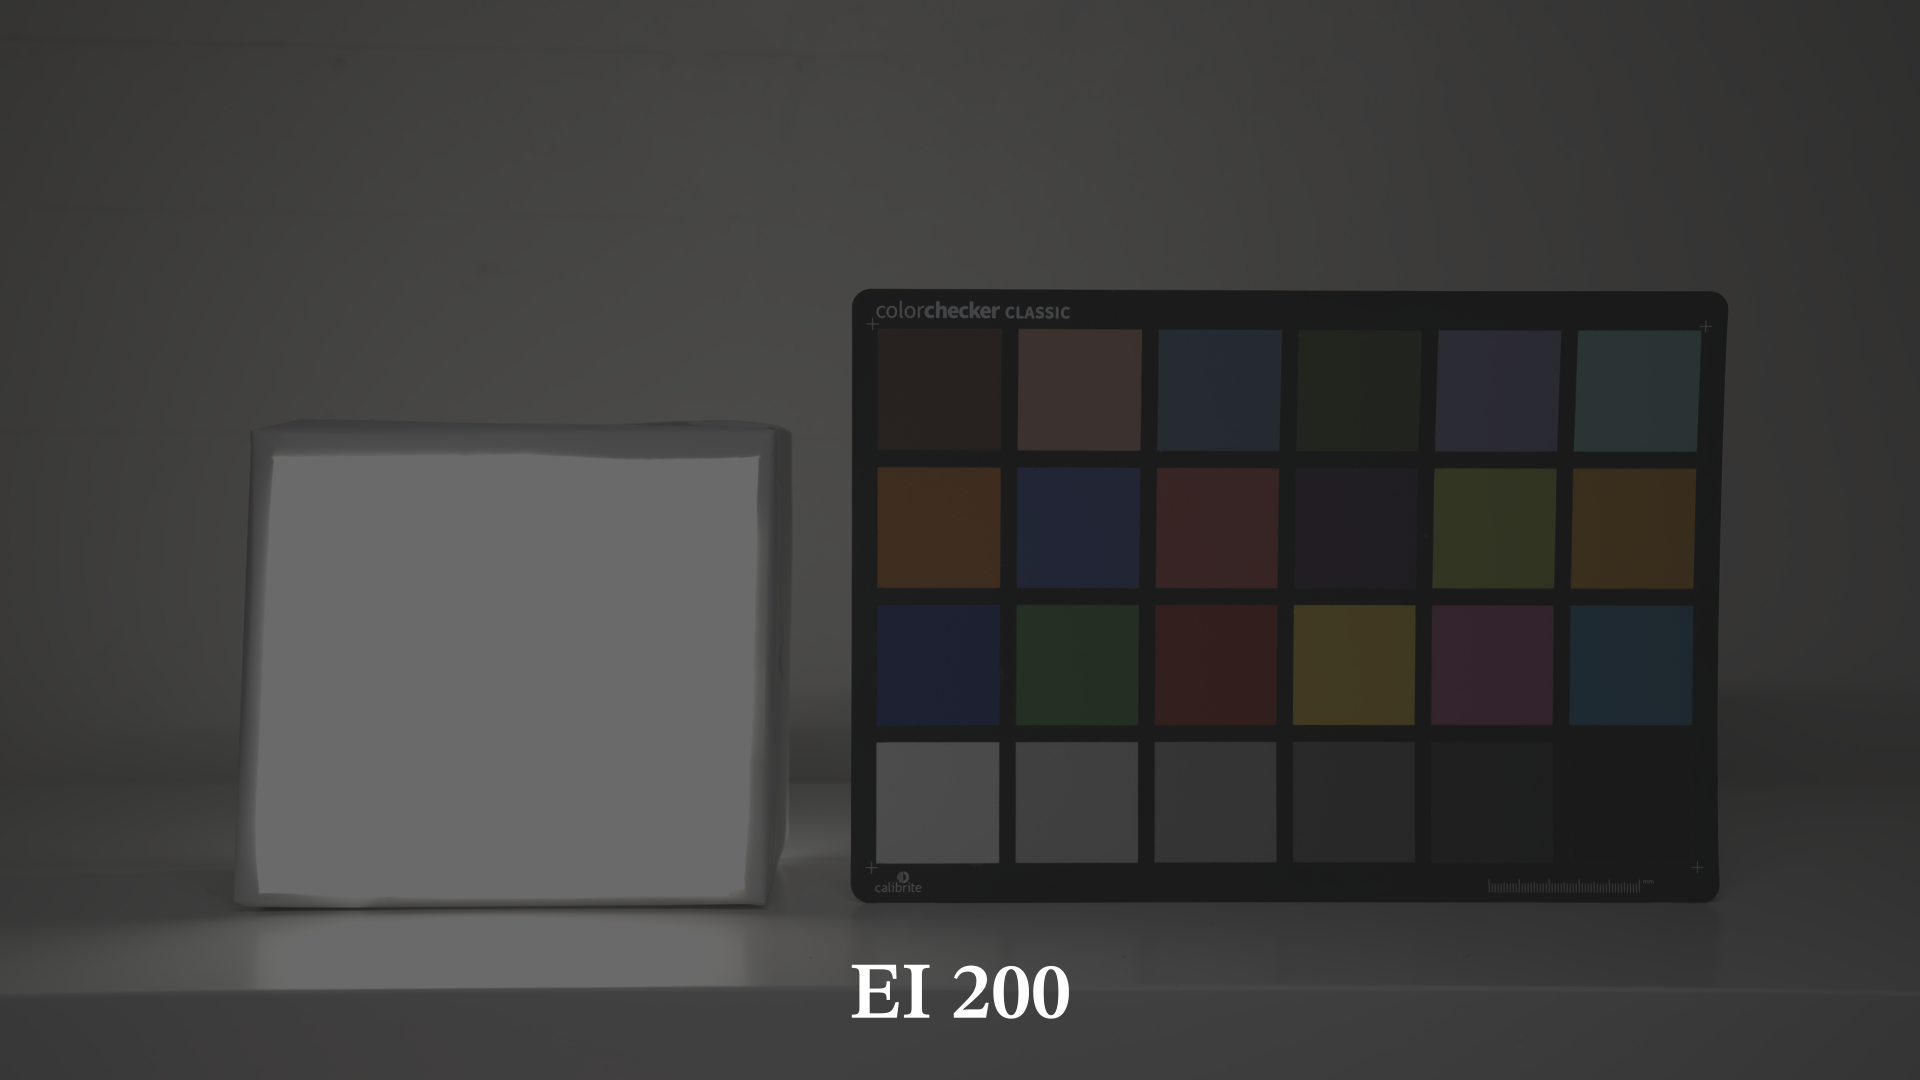
Here the same scene (the from the waveforms above) exposed using different ISO amplification levels (I actually used the Exposure Index), as the ISO changes I used the shutter angle to compensate and have exposure level on the color checker grey patch stay constant.
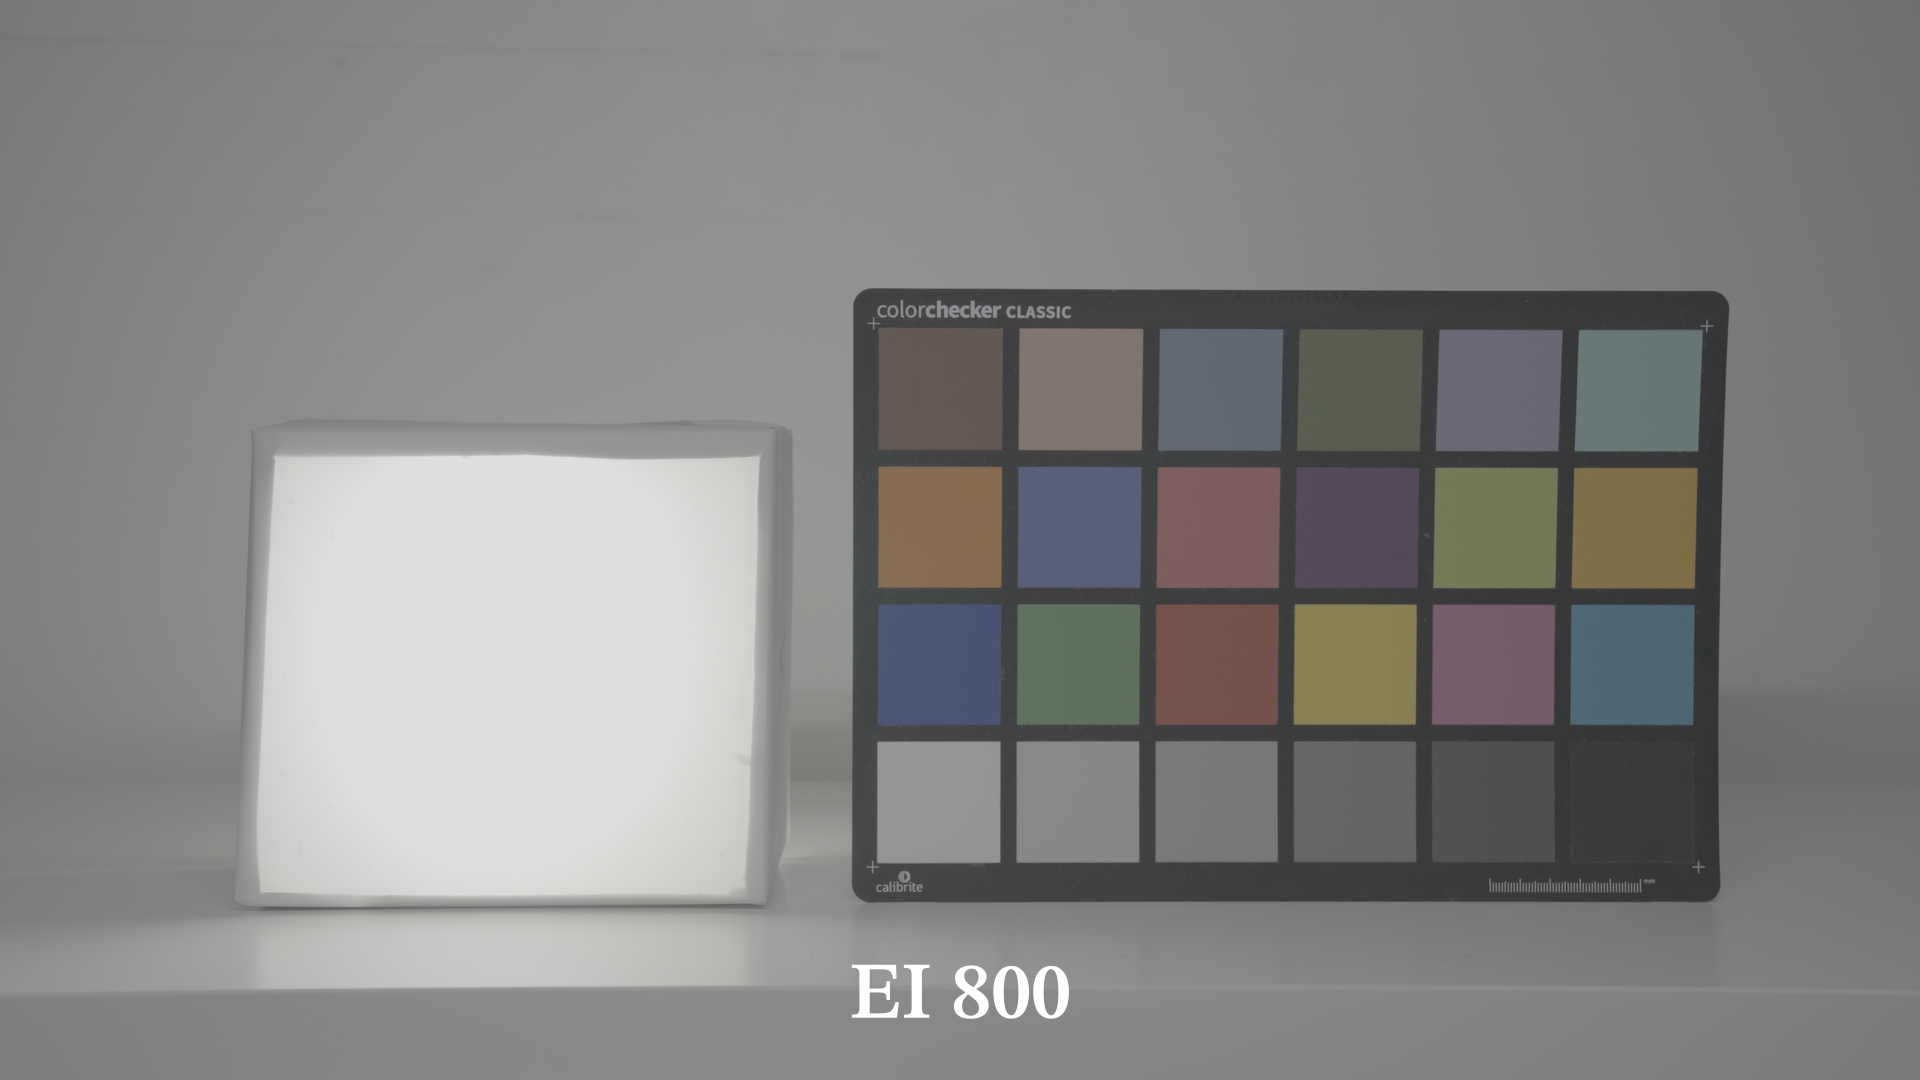
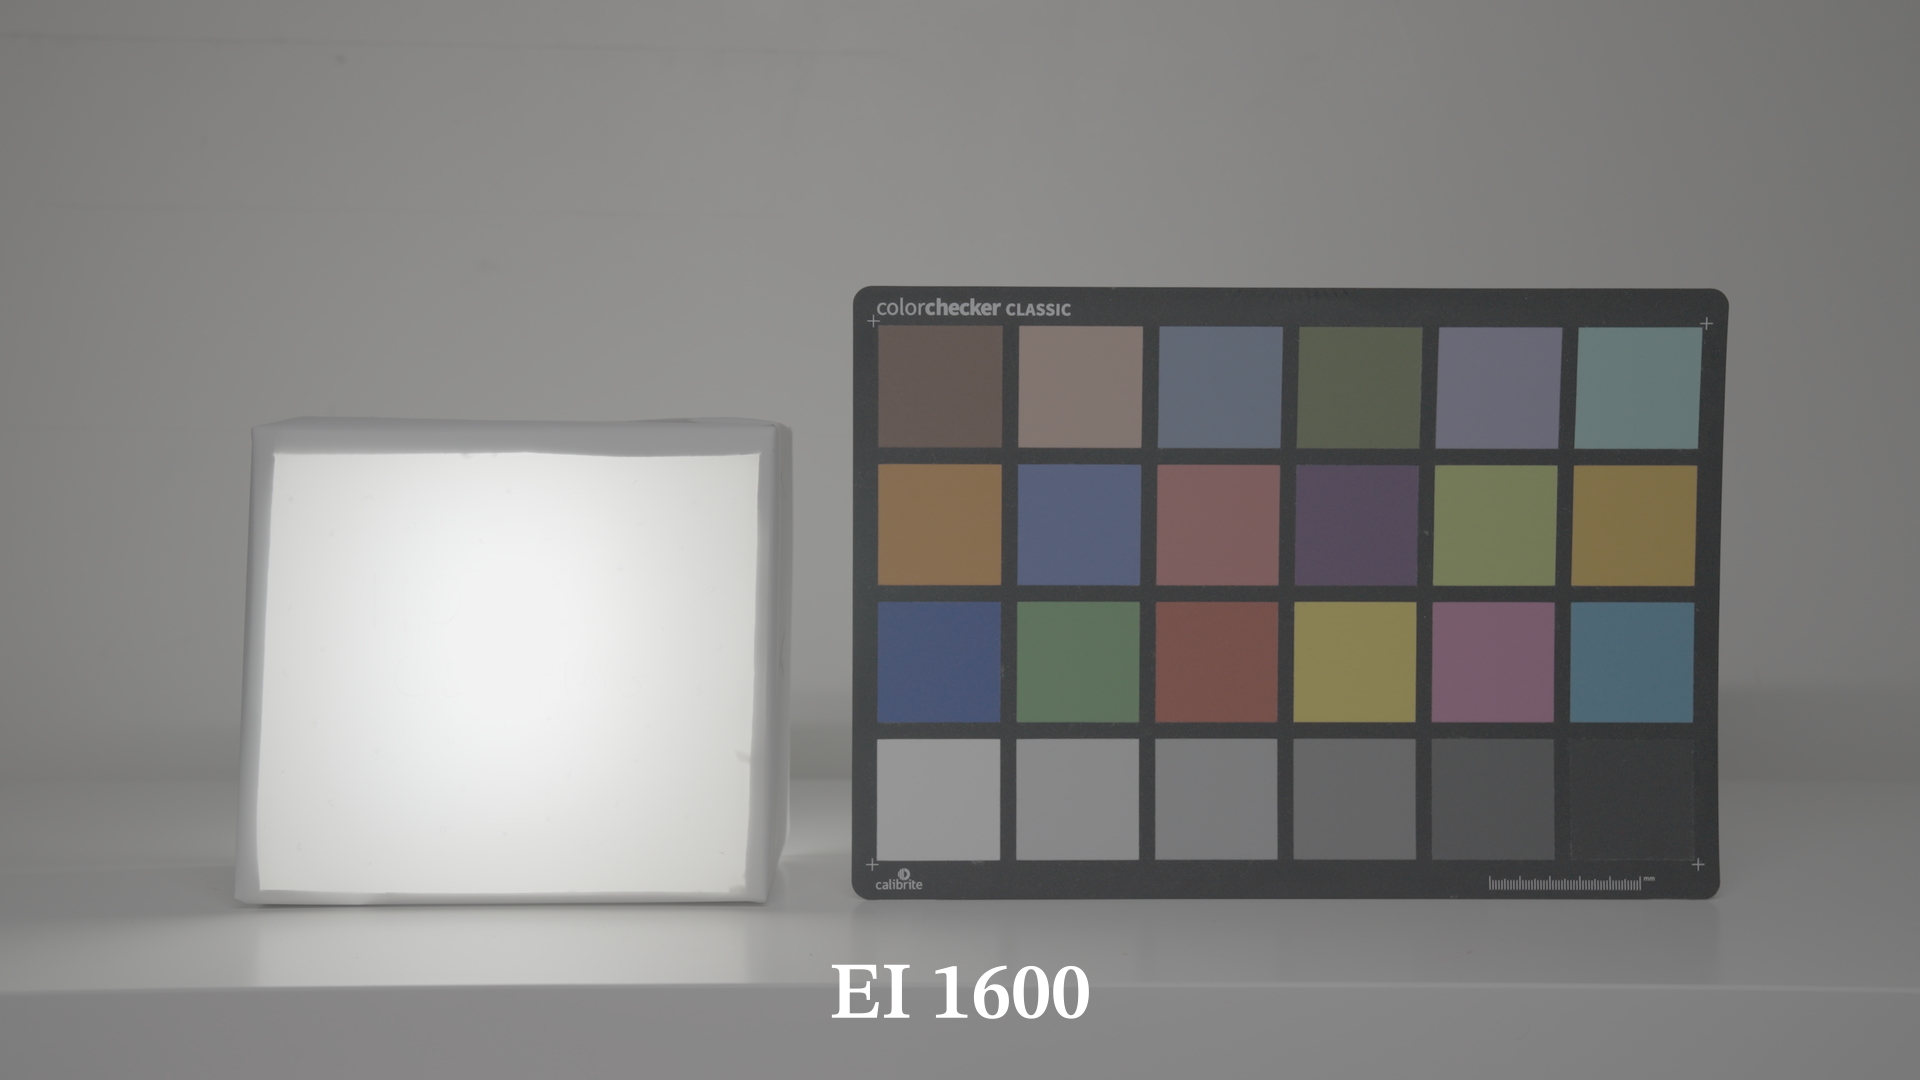
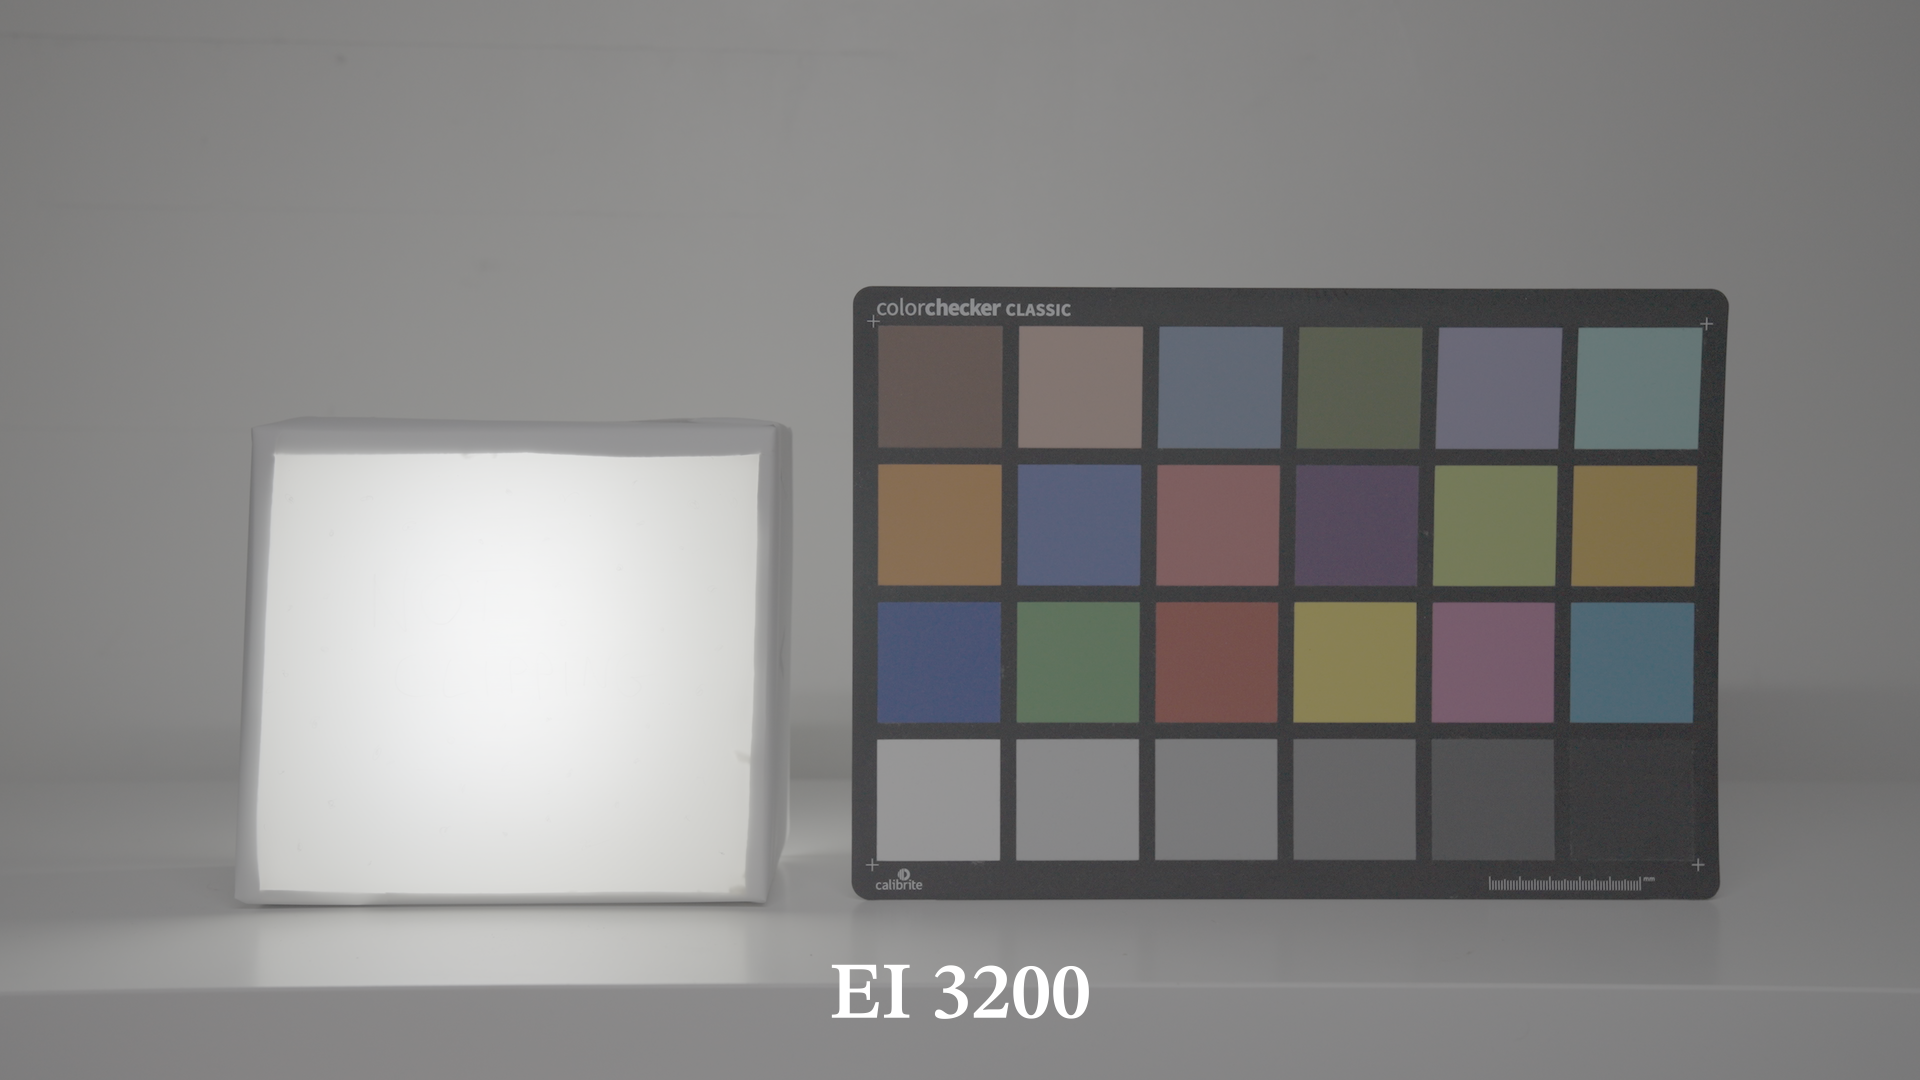
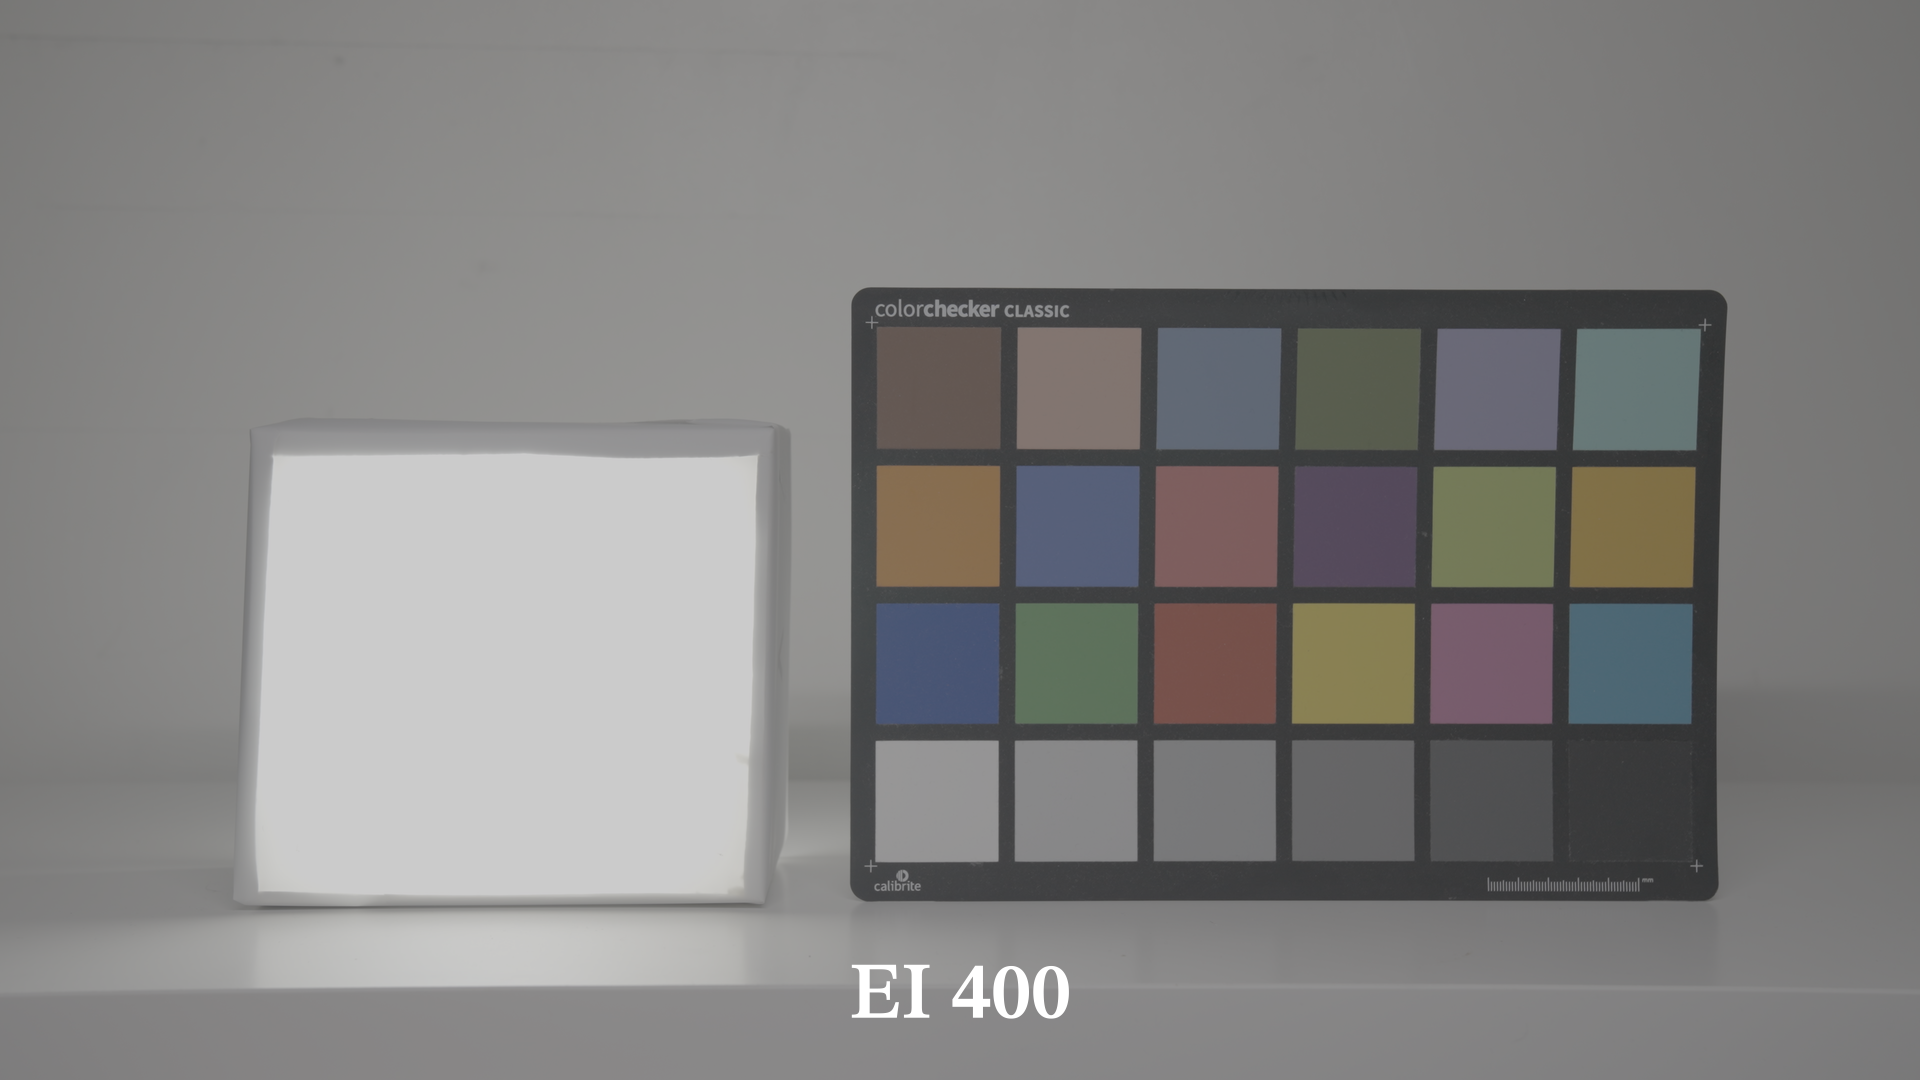
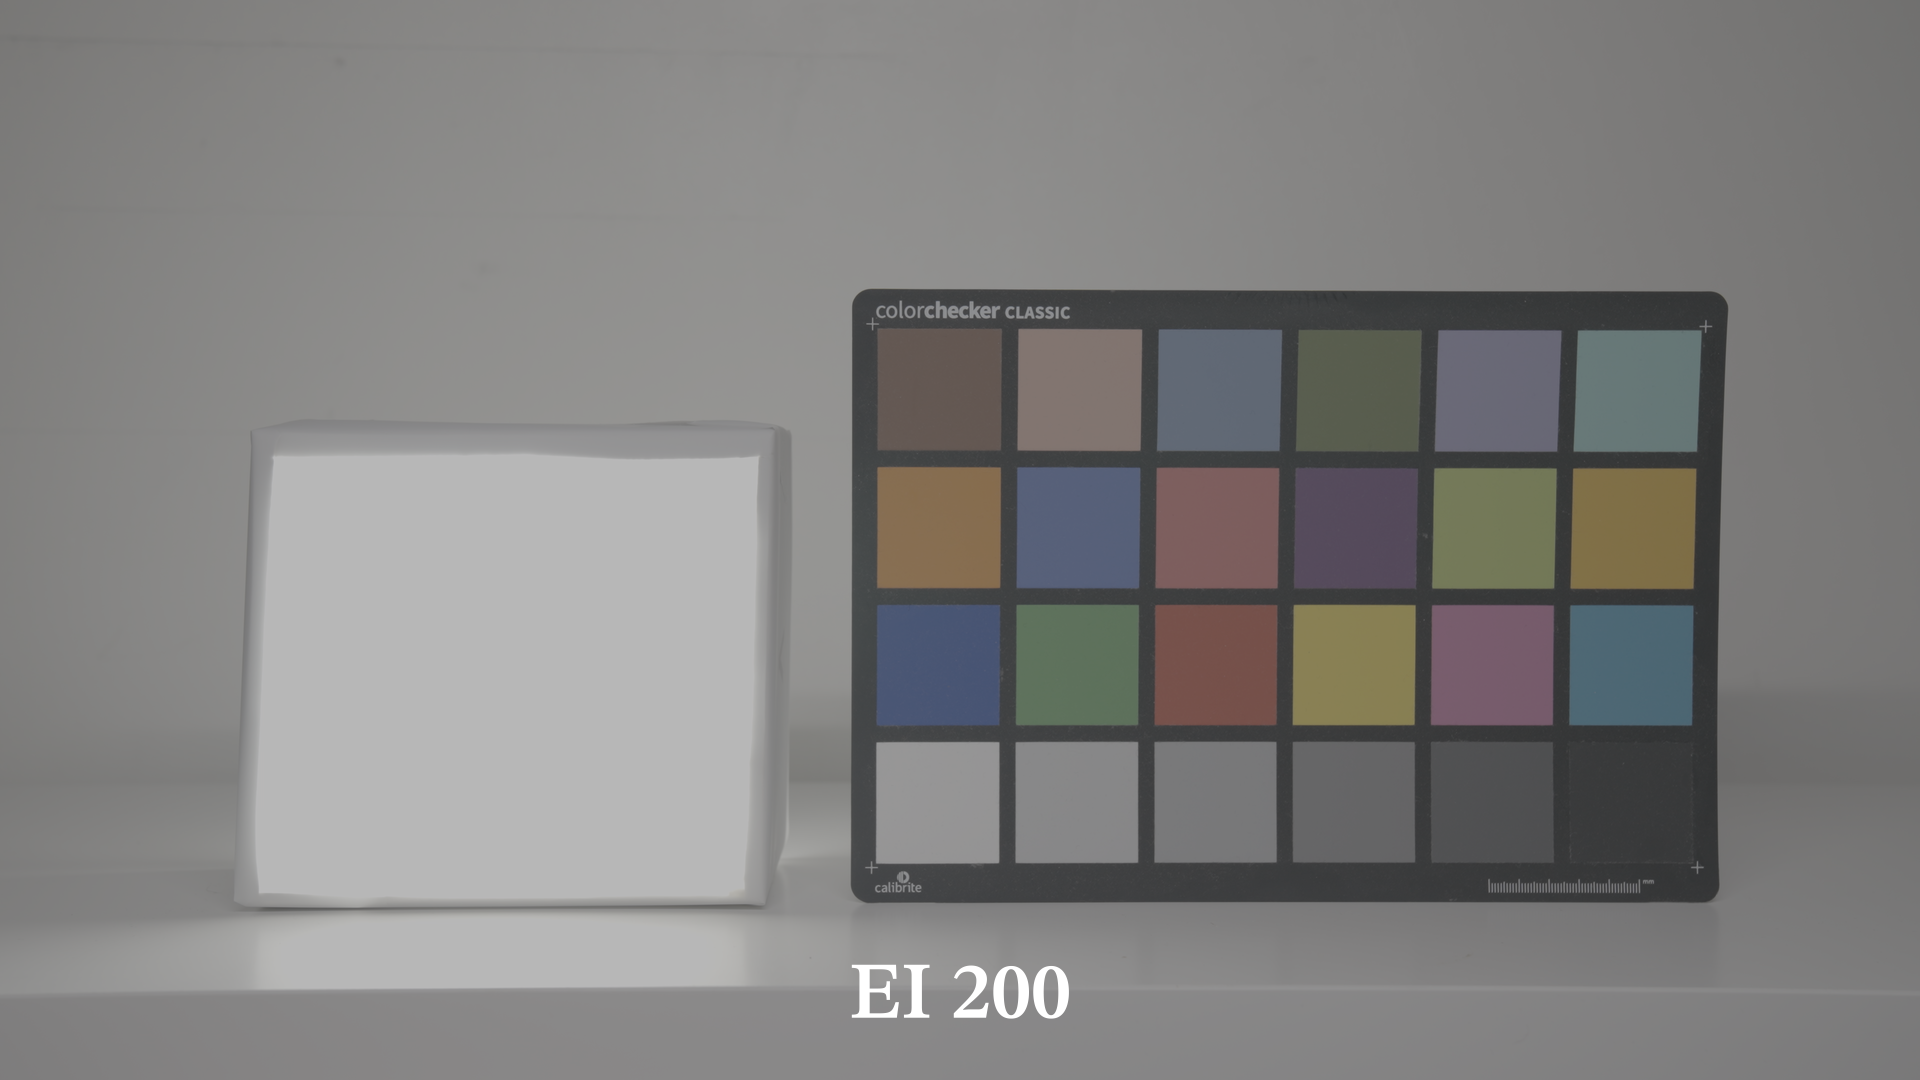
In the following gallery I brought down the image in post by exactly 4 stops photometrically, you can see that as the exposure index goes up we are preserving more details in the highlights, and the faint, pencil written “Not Clipping” on the box starts to appear. (I’m not sure it’s clearly visible with the compression of the website)

So to sum it up: ISO does not directly affect exposure, it affects the way you expose the image by biasing your decision in a certain direction. For a low-key moody scene, where the important details are mostly in the shadows, one could rate the camera to EI 400, give a healthy amount of light to the sensor, achieving a moody, yet clean image. On the contrary it could be useful to rate the camera to EI 1600 if one wants to retains more details in the highlights.