
Texture Suite OFXs
The different approach to authentic grain and texture for your digital footage.
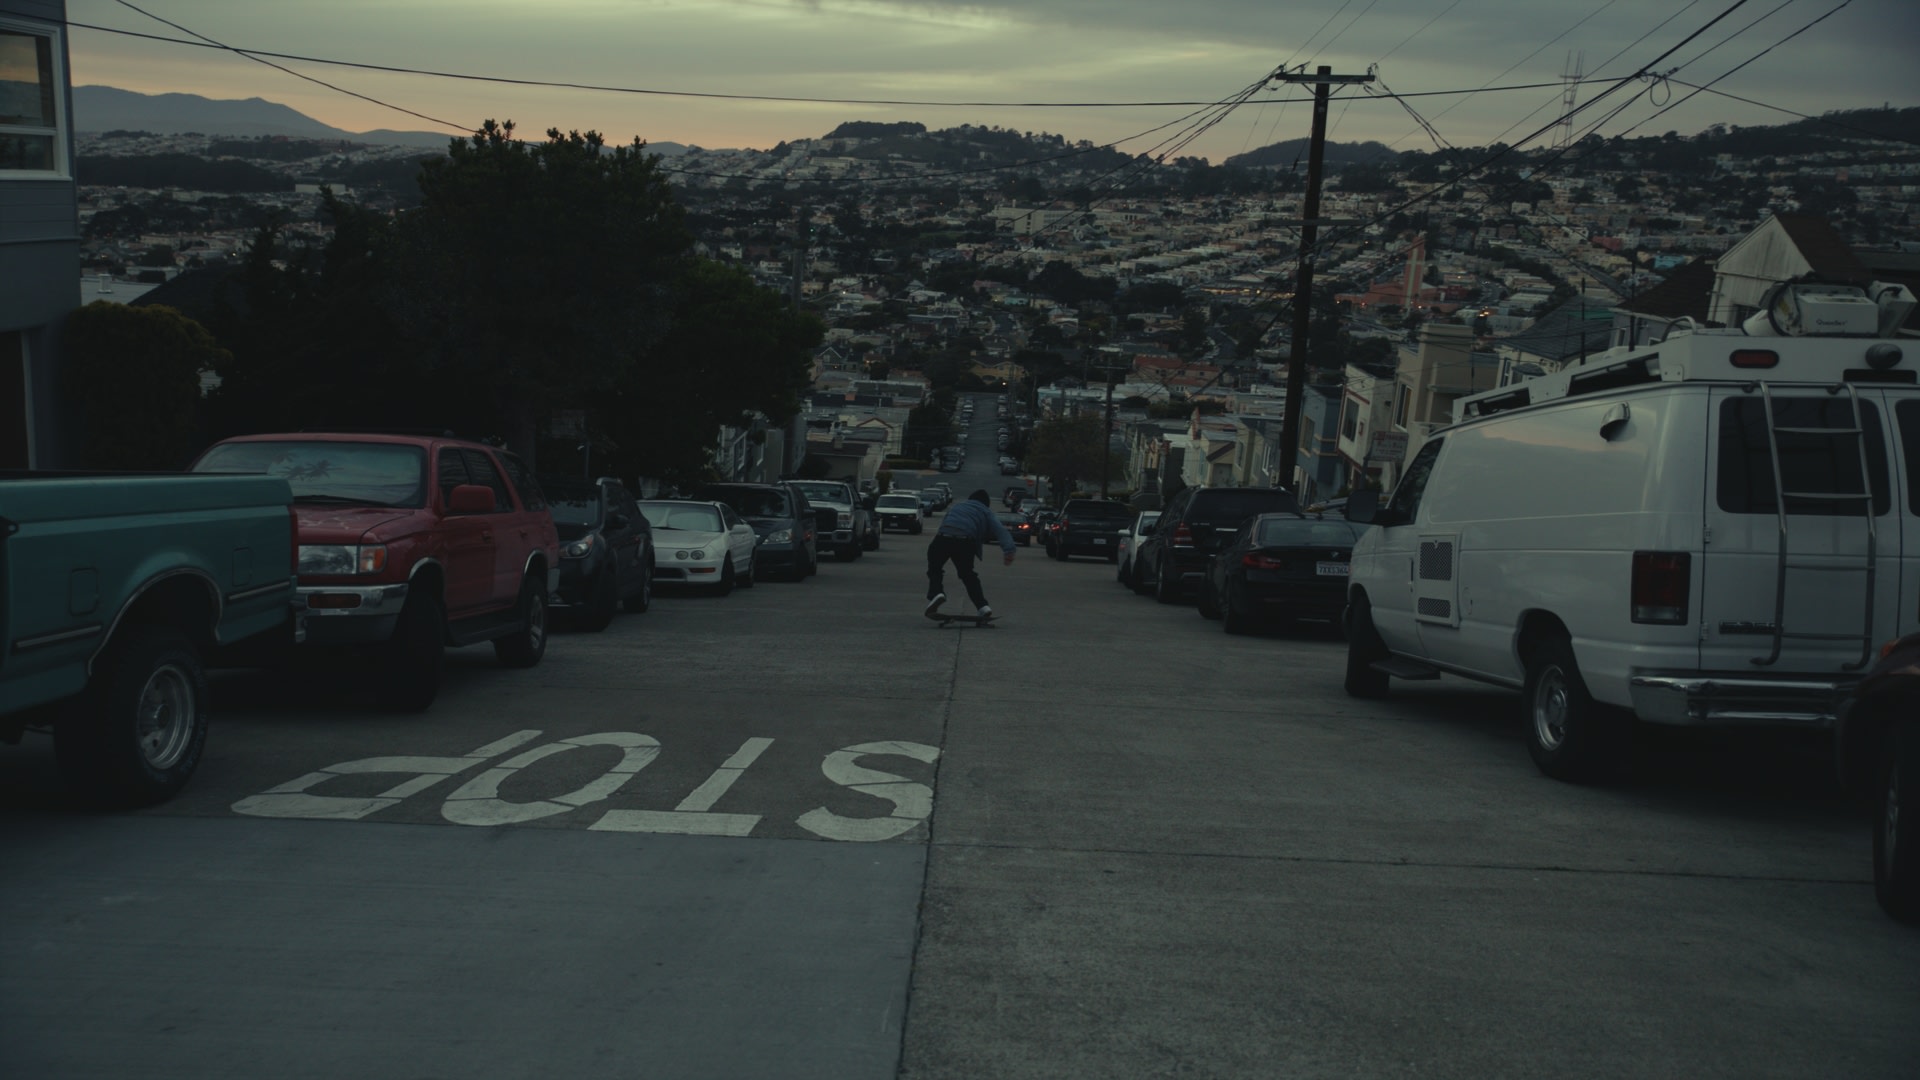
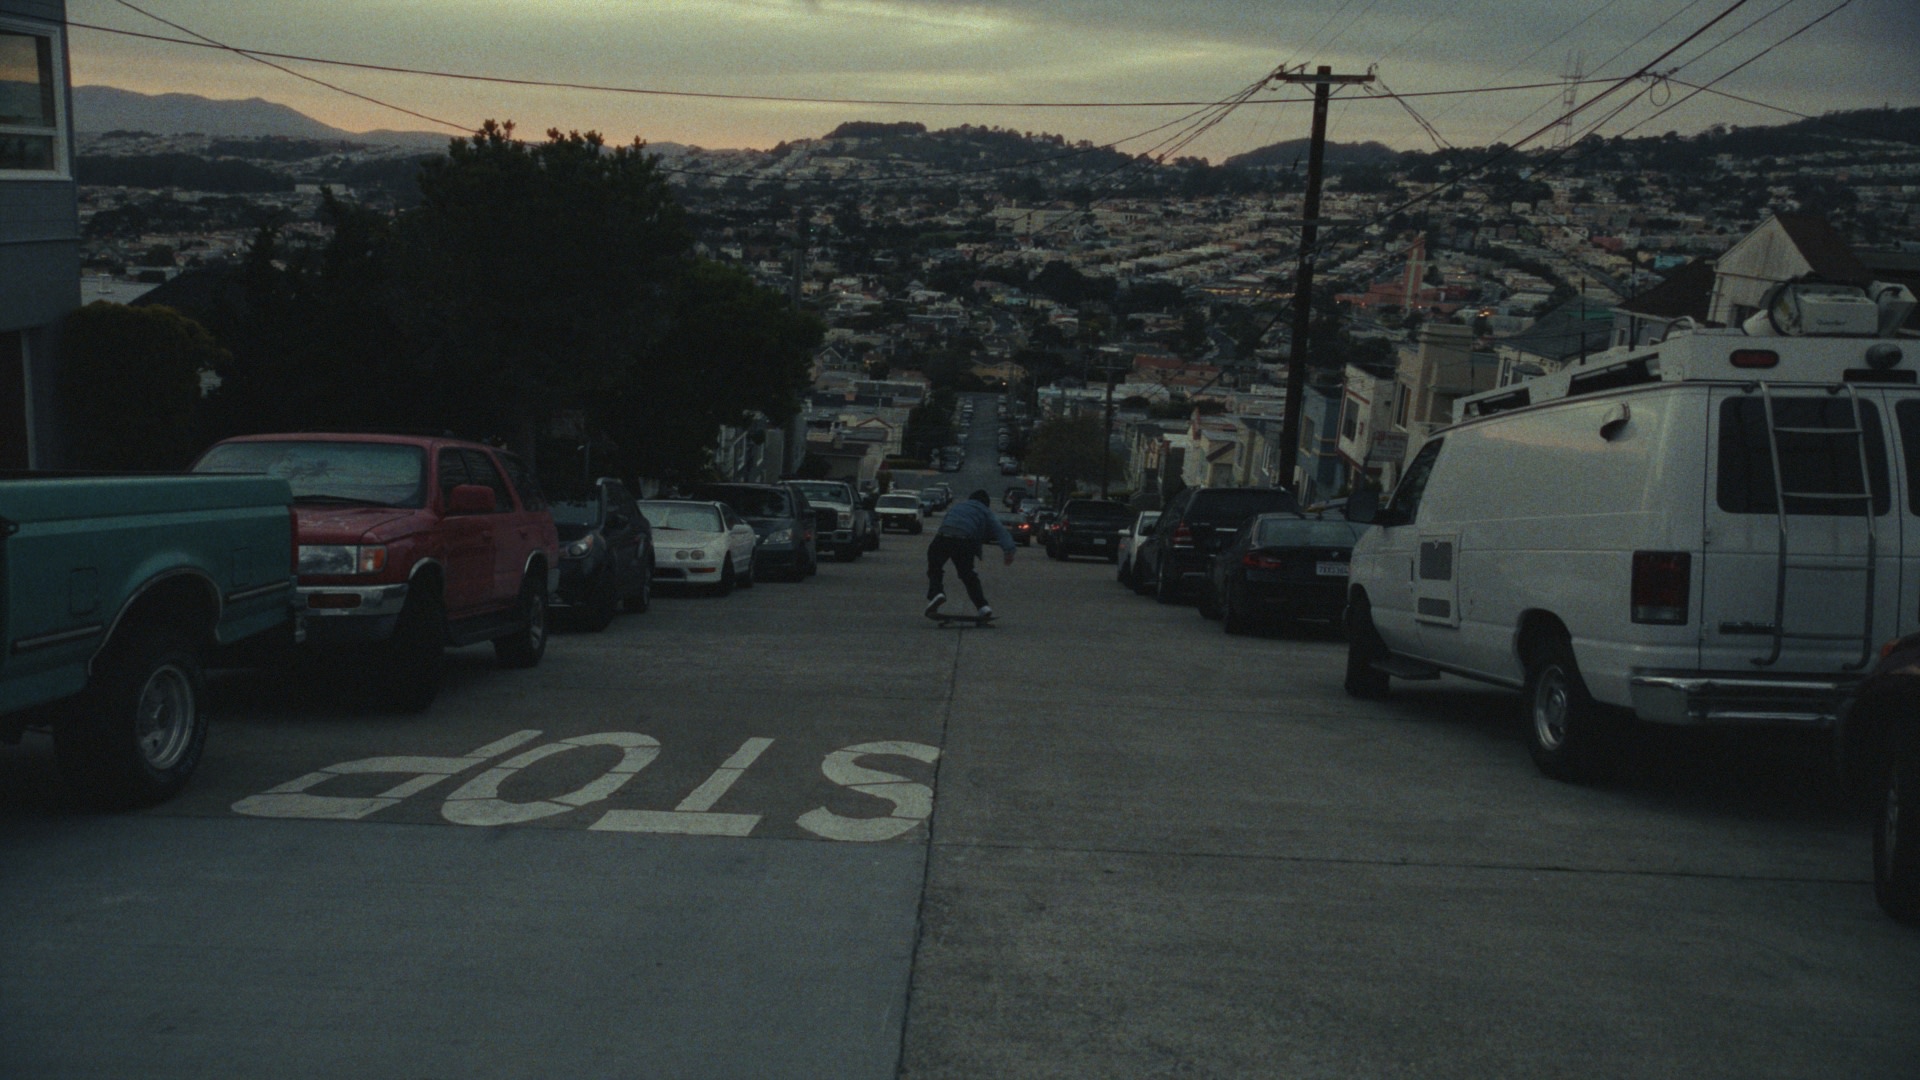
Have you ever noticed that, when you add film grain digitally, it might look perfect on a blue sky or a gray wall, but that same grain layer might be completely overpowering on skin tones?
Beyond this, there is another more fundamental problem: digital grain often feels like a layer on top rather than an organic part of the image.
Why FilmMatch Grain is different than anything else out there
As with anything I do, I like to take the most scientific approach possible. So… prepare for a bit of a dive.
There are usually two ways film grain can be emulated: with a grain plug-in, or through manual compositing.
What most plug-ins do
Normally, a grain plug-in creates random noise that is statistically inspired by film, and composites that onto the image. Then you can tweak the amount, or compositing strength, of the grain in different luminance regions like shadows, midtones, and highlights. And that’s pretty much it. The problem is that this approach neglects an important characteristic of film: the grain appearance is density-dependent.
Taking DaVinci Resolve grain as an example, the shadow, midtone, and highlight controls modify how strongly the grain is composited onto each luminance range, but they don’t change the underlying noise that is being composited. So yes, you can make the grain stronger or weaker in different parts of the image. But the grain itself is still the same grain.
A better approach, used by very fancy and expensive plug-ins like LiveGrain, is to shoot grey charts and create grain plates at different densities, or exposures, and then composite those plates into their appropriate luminance ranges. This already brings us one step closer, because it takes into account how film behaves at different exposure levels. But still…Film grain is more complex than that. In fact, this approach still doesn’t solve a fundamental problem:
How should the grain look when it encounters a skin tone? Or green foliage? Or a blue sky?
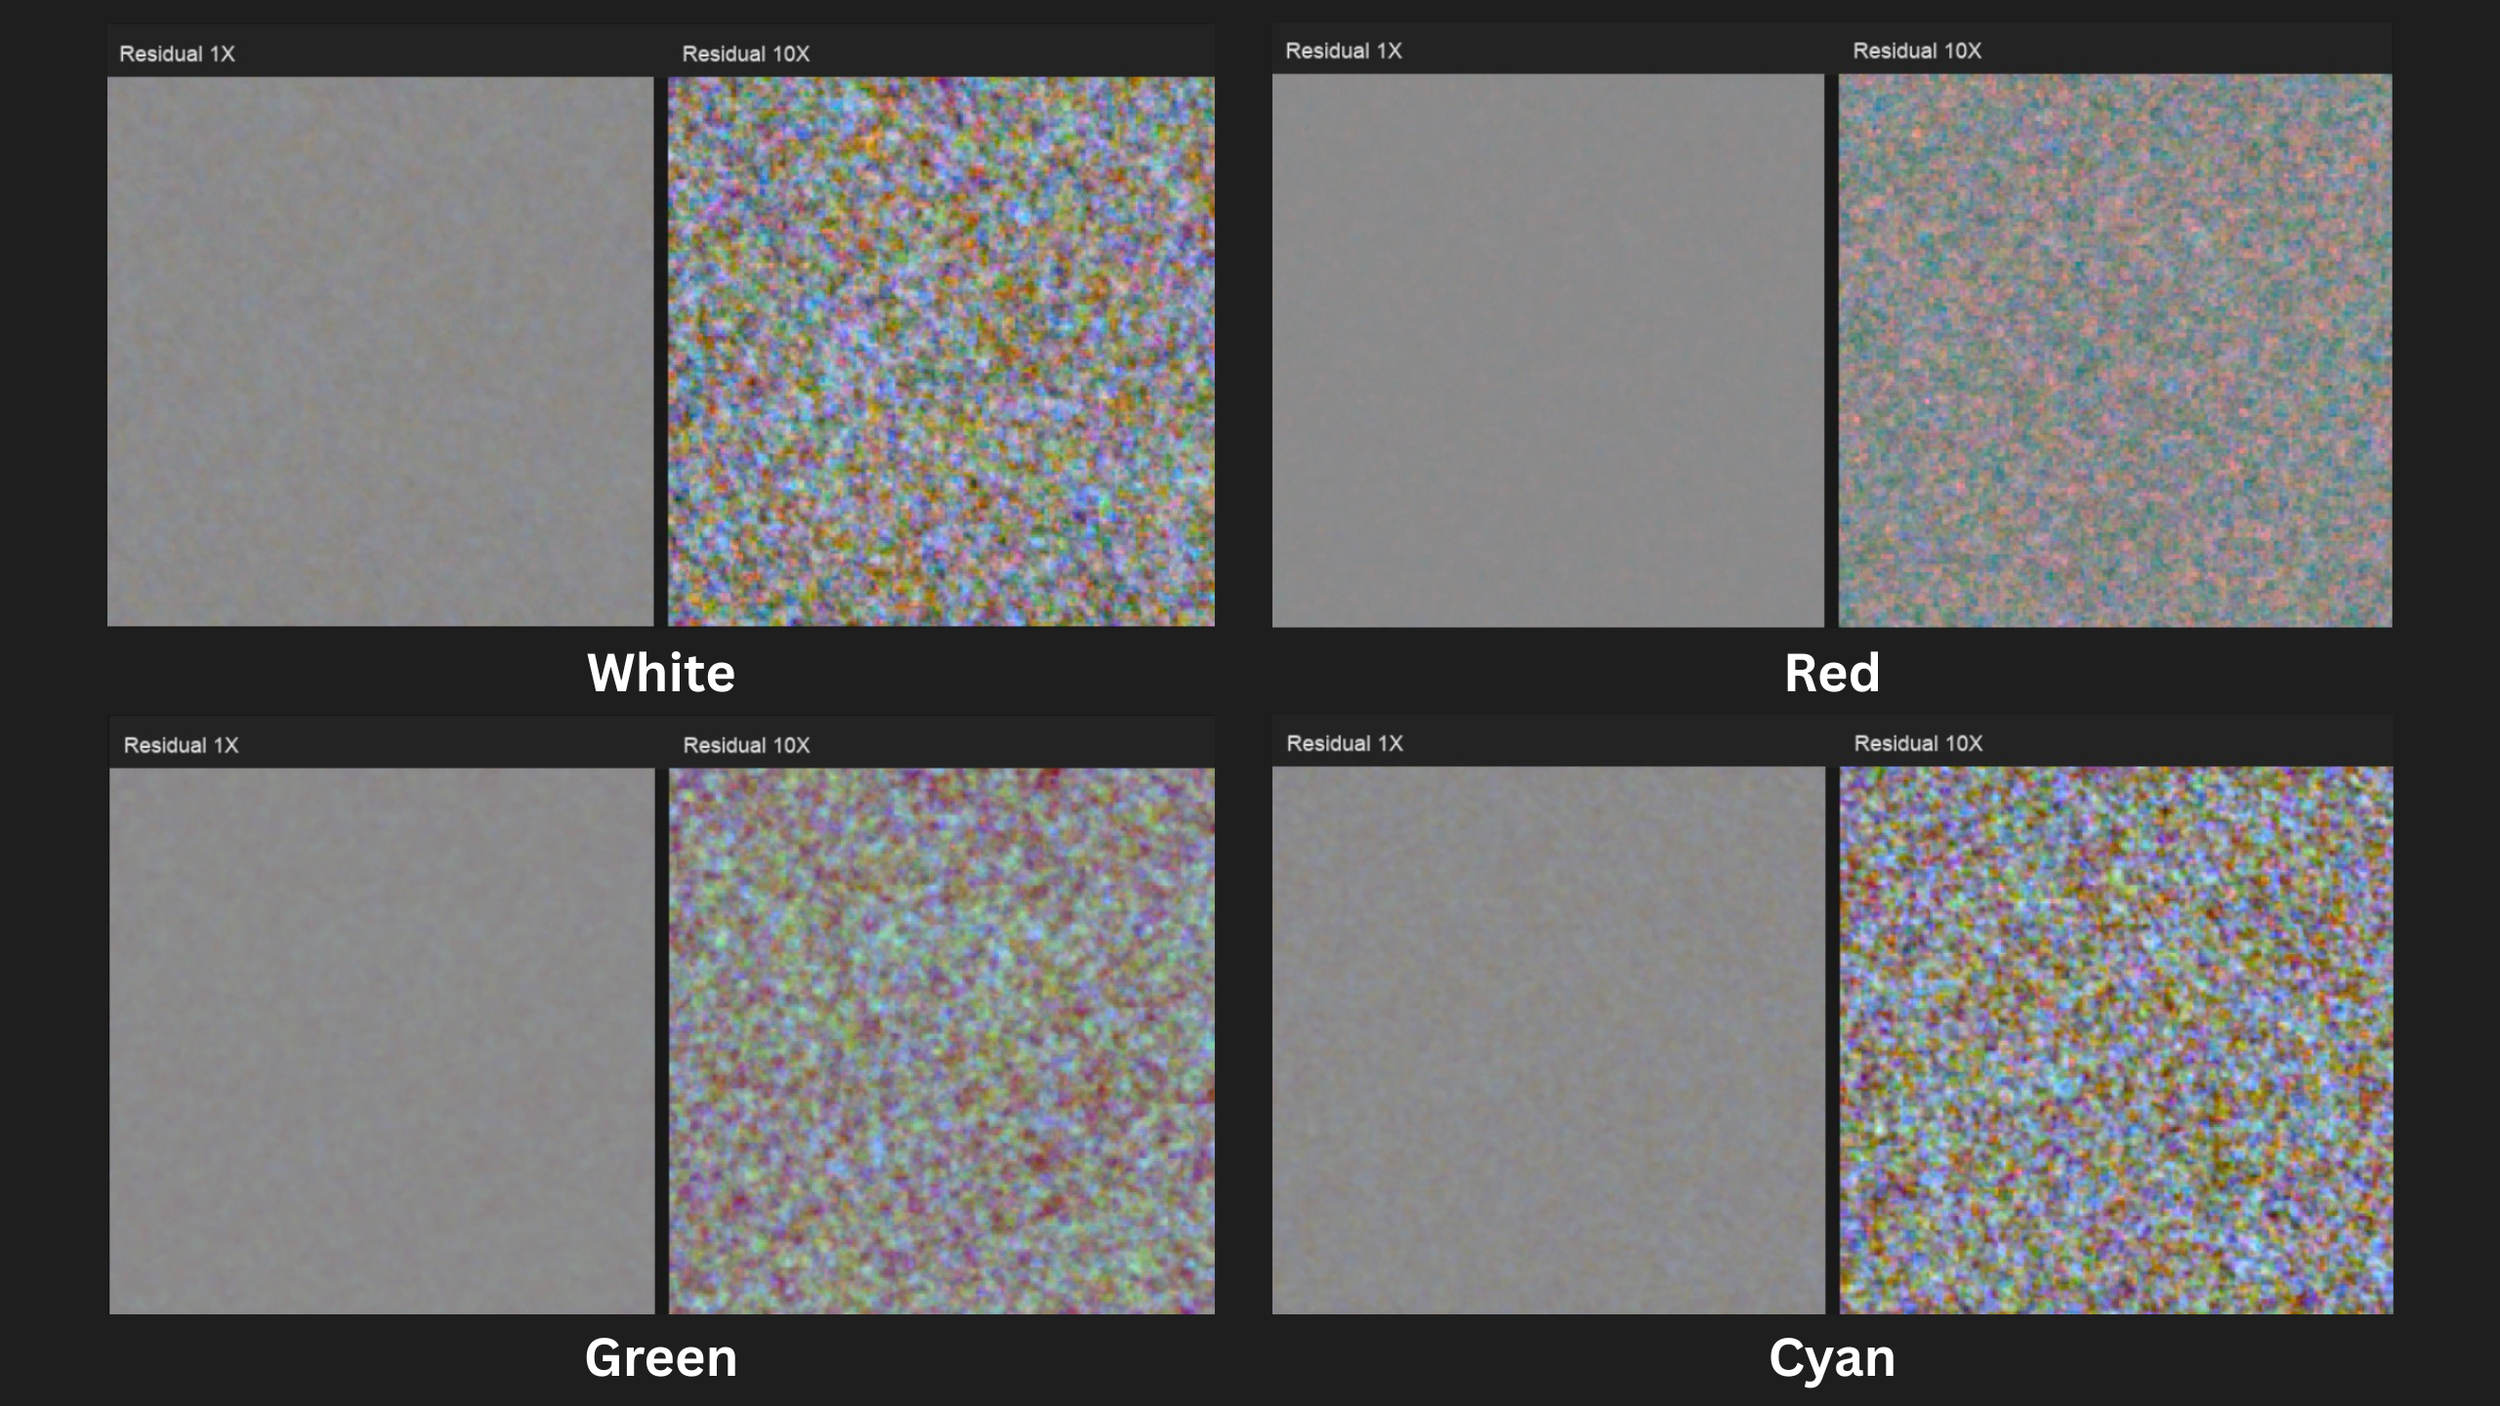
Grain on film doesn’t only respond differently based on density. It also responds differently based on which layer of the film stock was excited during exposure. That is why, when you overlay a fixed grain plate, or even an exposure-dependent grain plate, the result can still feel wrong. Have you ever experienced that when the grain feels right on a blue sky or on a grey wall, it’s almost always overkill on skin tones? That’s because we are not taking into account the difference between the three dye layers of a film stock, which can produce different kinds of grain appearance and strength.
Below the appearance of grain of real film scanned at 6K (here you are seeing a compressed enlarged patch size), of different color classic patches. You can see how the grain changes in appearance as different layers are exposed differently.
Grain and sharpness cannot be separated
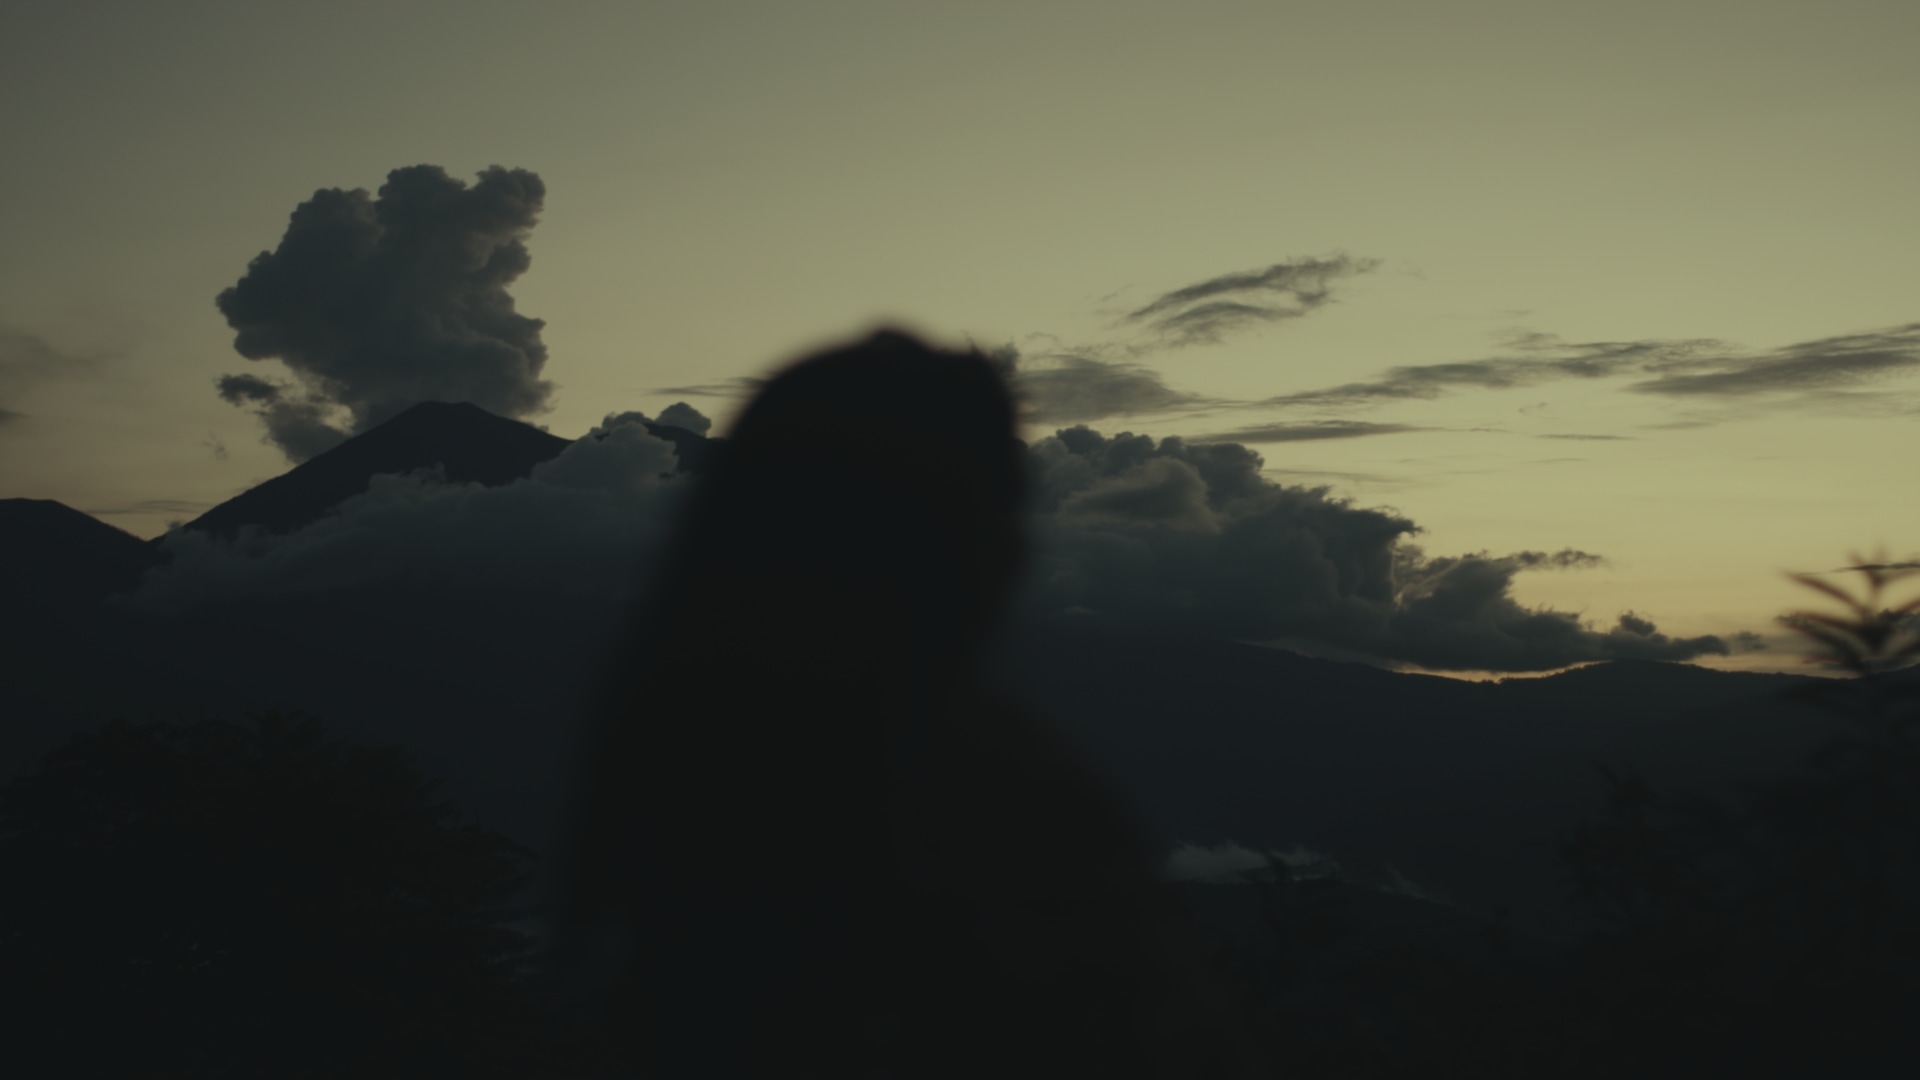
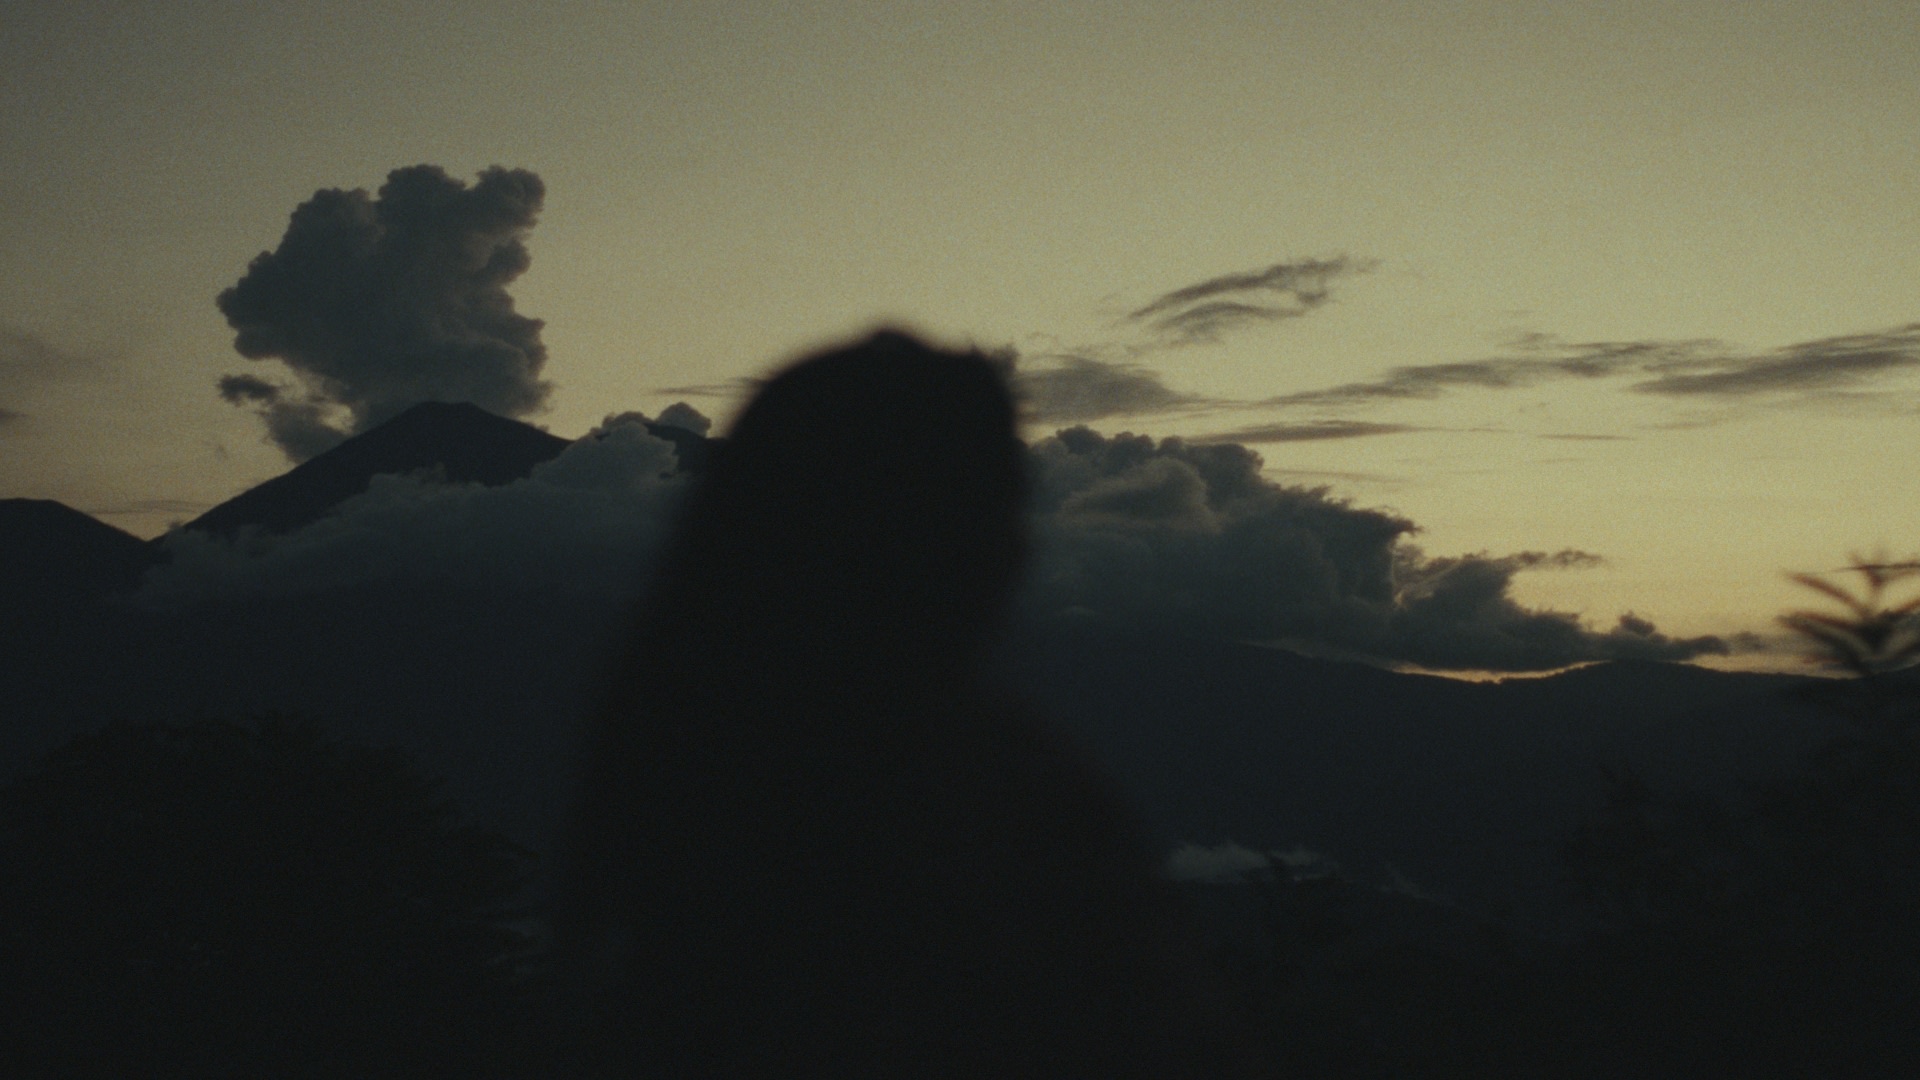
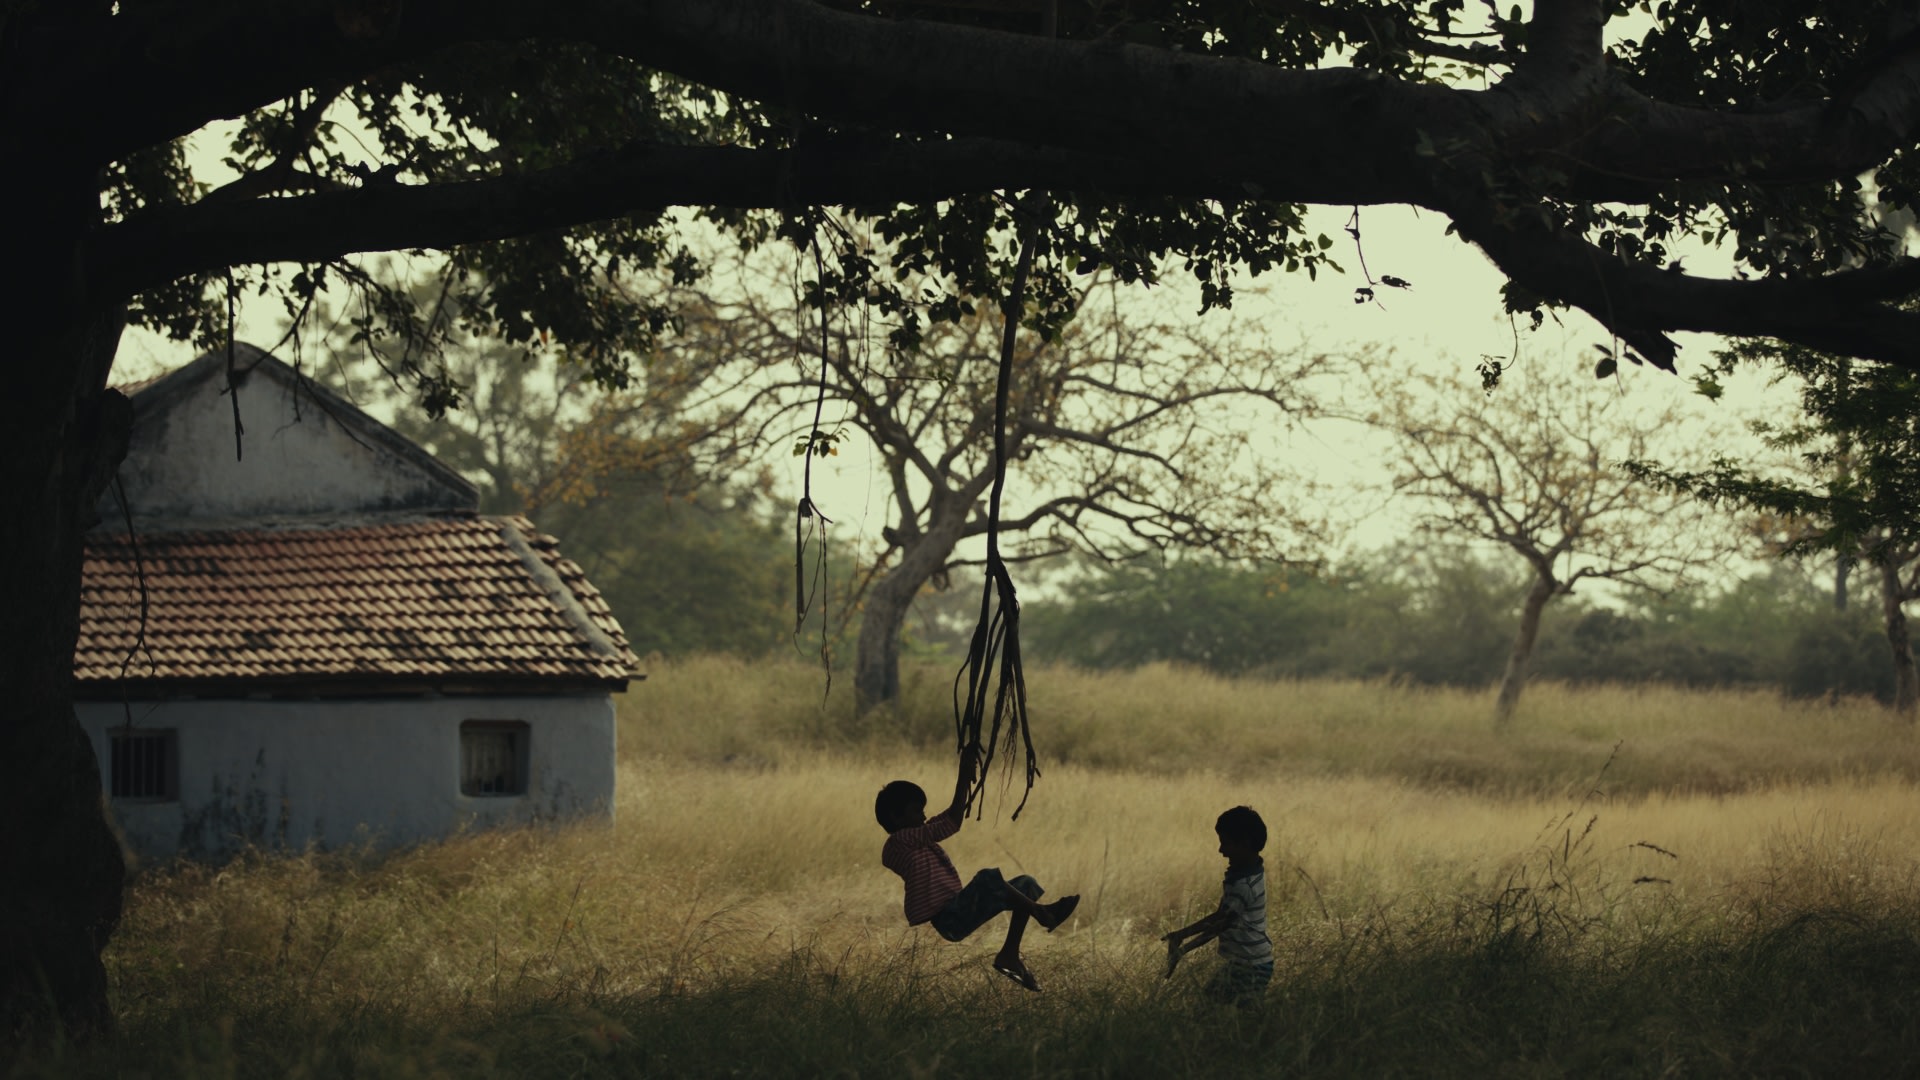
The other aspect to keep in mind is the underlying sharpness or softness of the grain, and the sharpness or softness of the digital image we want to grain. On film, the grain is the image. Grain and image are not two separate things, because the image is literally formed by the silver halide particles. Therefore, if we want the grain to feel like it is part of the image, we need to understand that we cannot fully separate the sharpness or softness of the image from the sharpness or softness of the grain itself. What we perceive as grain when shooting film is the result of many optical stages, based on the specific workflow that created it. In simple terms, the digital image must match the same resolving power, or MTF, of the system that generated the grain we are compositing onto the image. If the digital image is sharper than the system that generated the grain, the grain won’t feel like it belongs to the image. It will feel like an overlay. Below an example with soft 16mm grain

No Grain

Grain No MTF
The image is sharper than the grain particles.

Grain & MTF
The underlying image matches the sharpness of the grain particles.
How FilmMatch Grain addresses all this
Clean
FilmMatch Grain & Halation OFXs
Clean
FilmMatch Grain & Halation OFXs

Clean
FilmMatch Grain & Halation OFXs
FilmMatch Grain is a real-time, procedural grain plug-in driven by two powerful components: a Grain Profile and an MTF Profile. The Grain Profile maps the exact behavior of a physical film stock across various exposures and colors, while the MTF Profile captures the resolving power of the optical system that produced it.
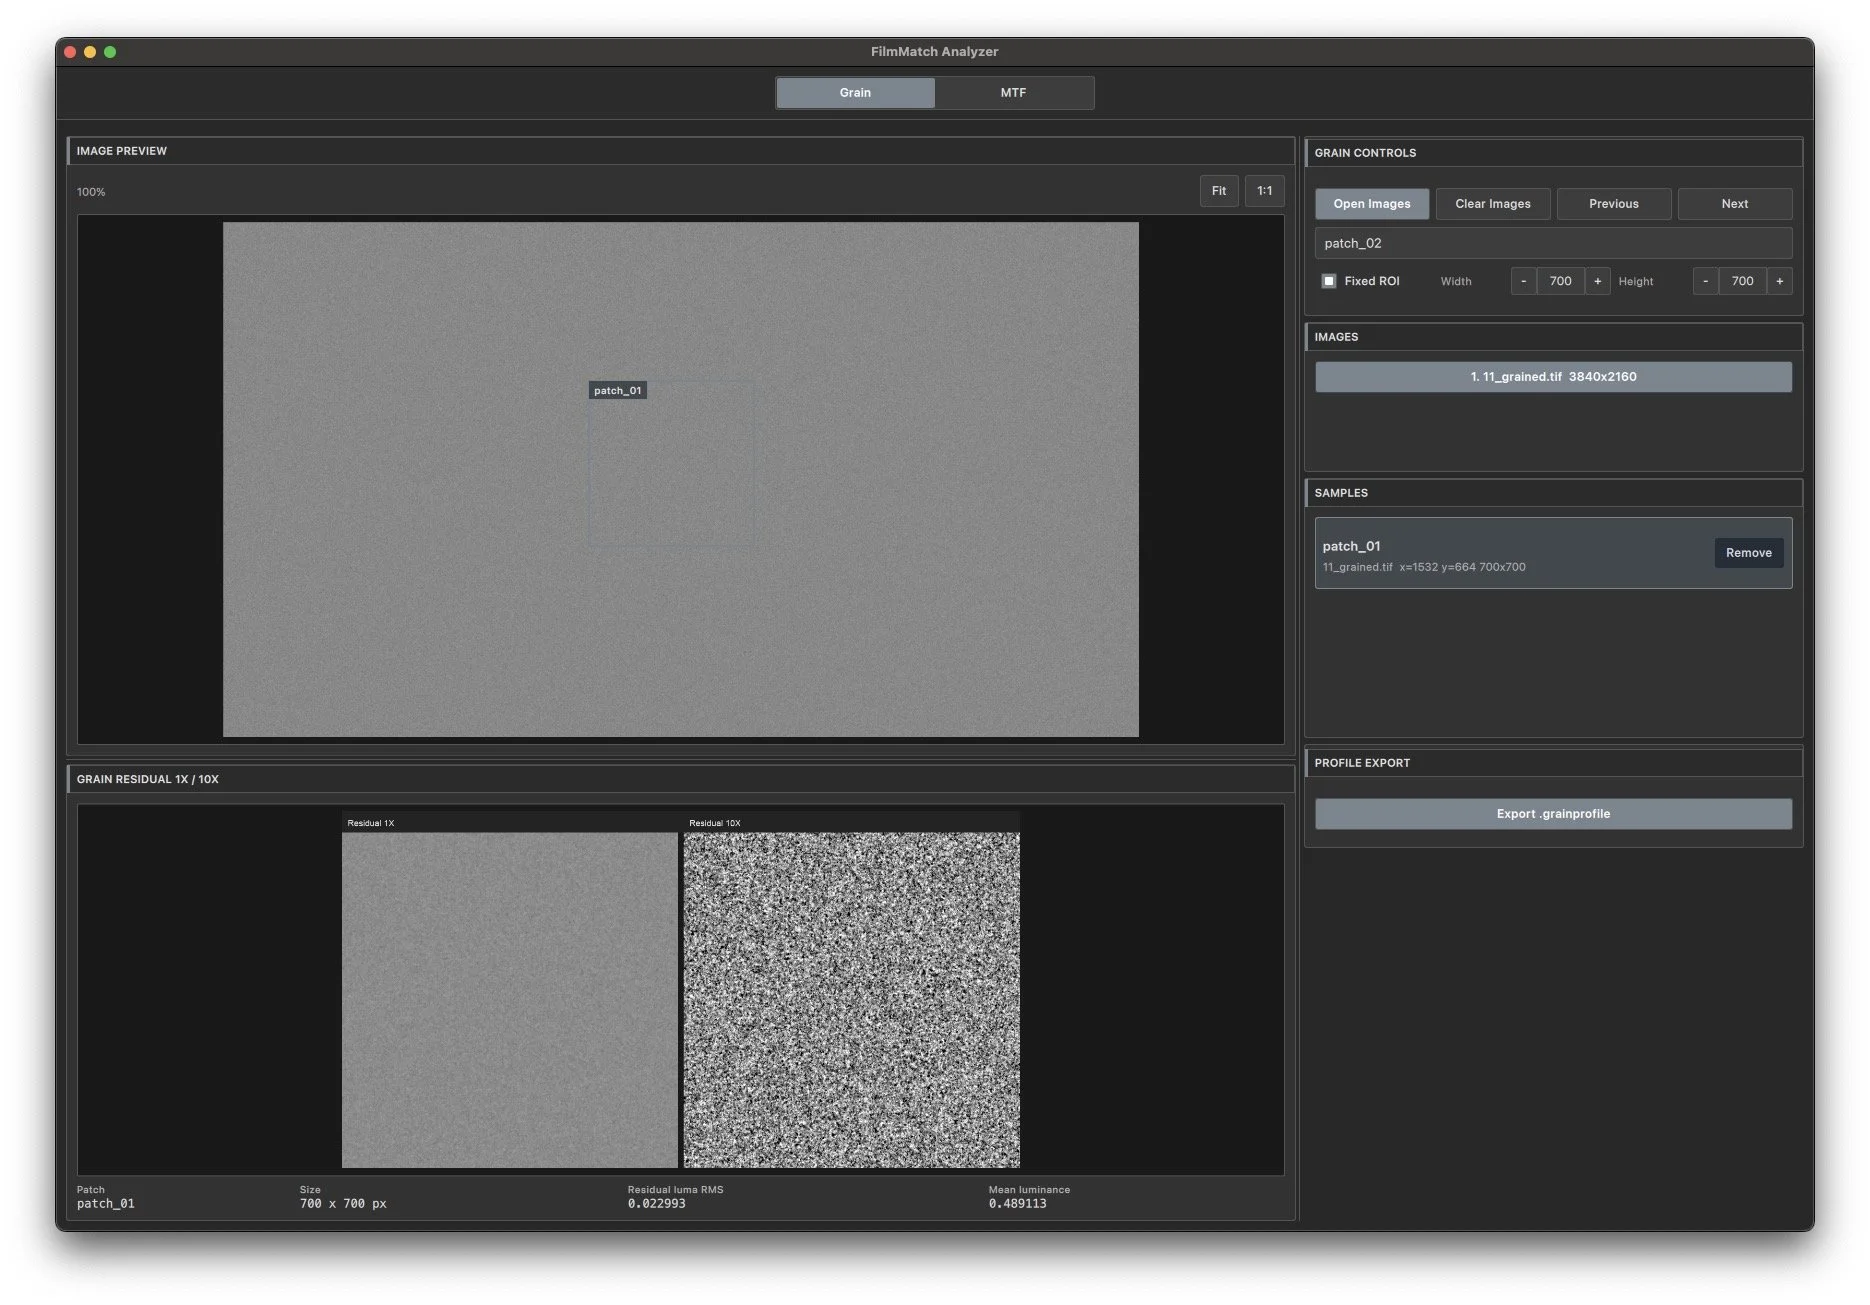
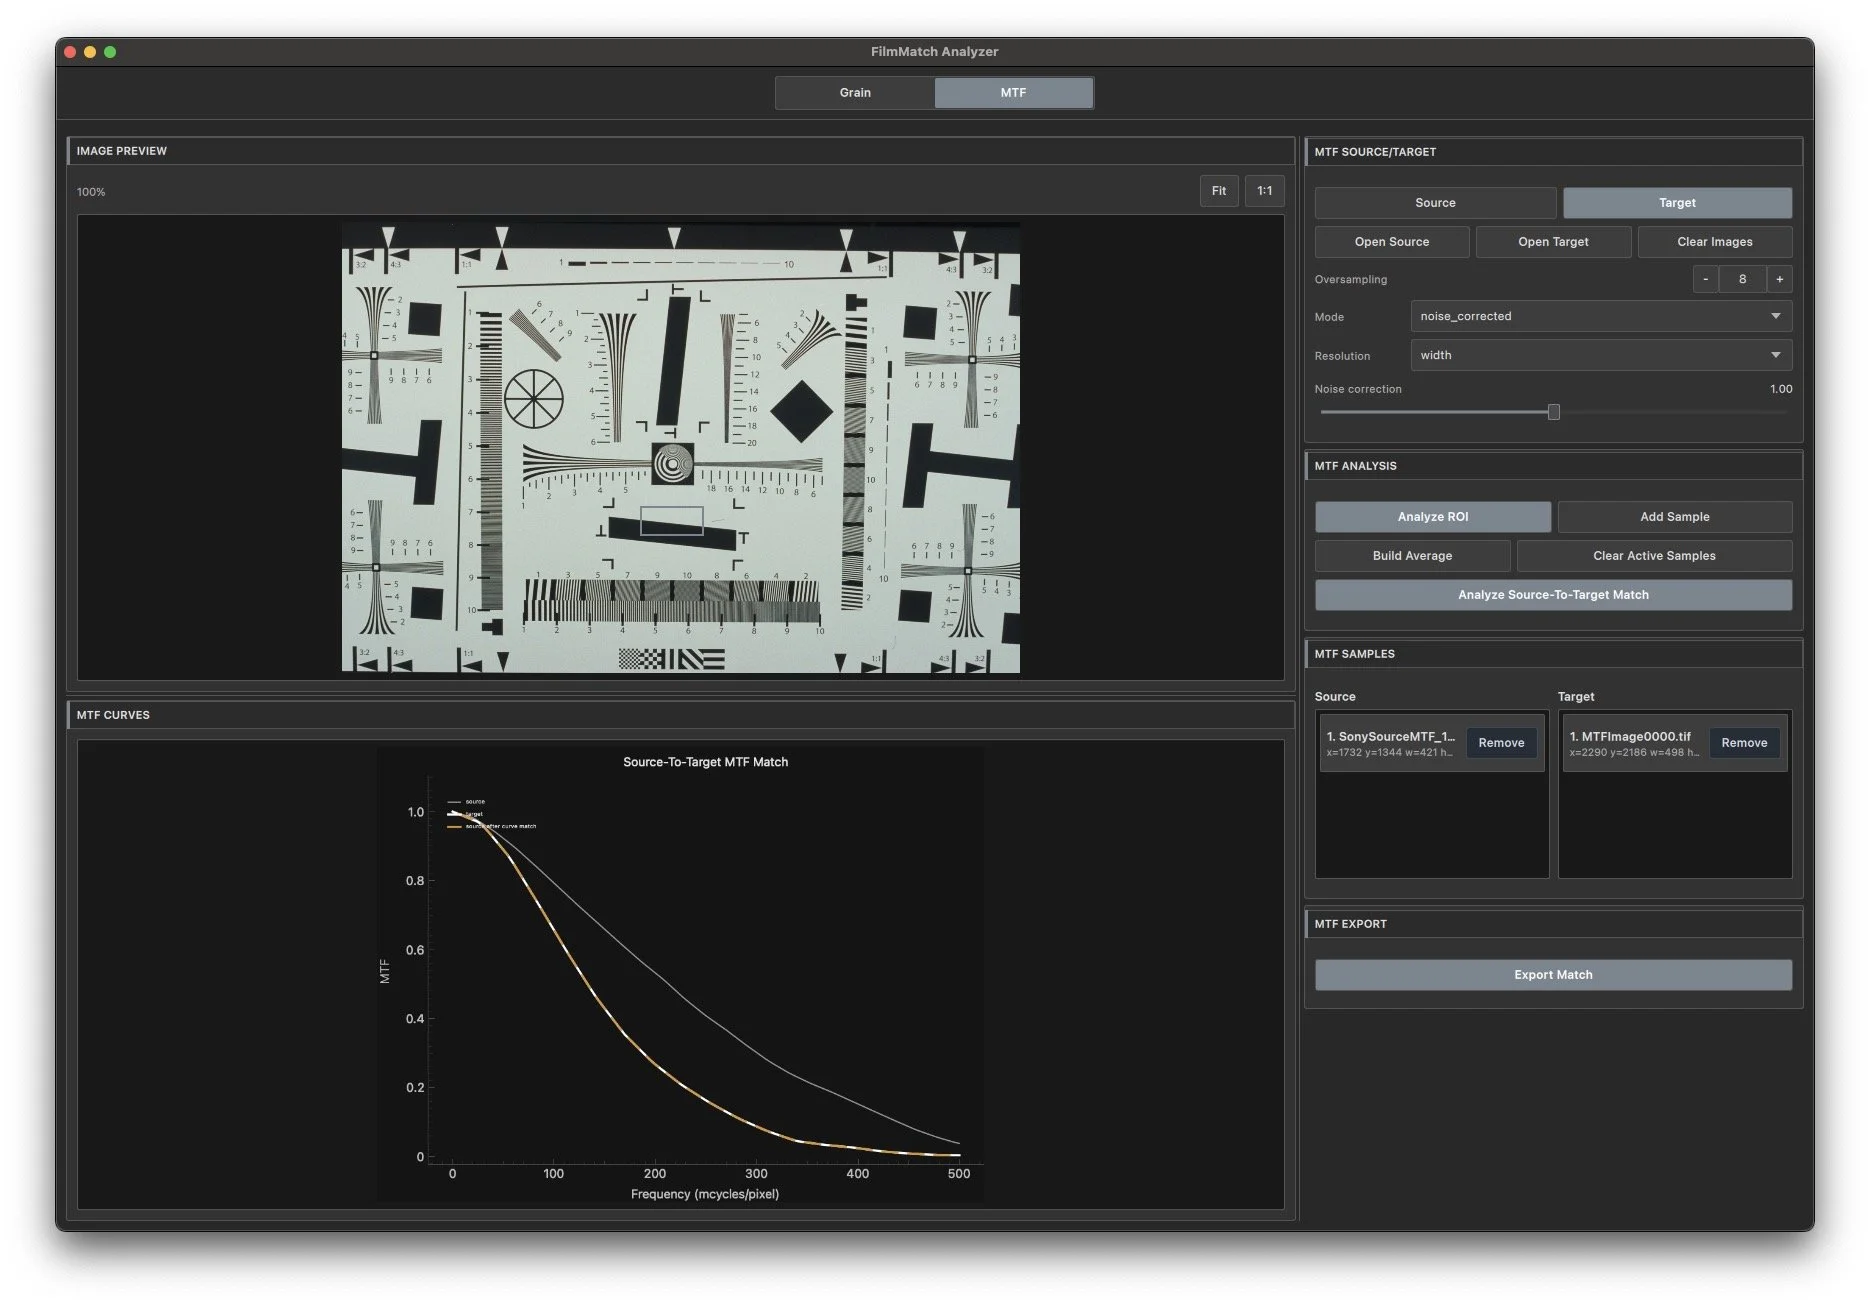
And the best part? The FilmMatch Texture Suite comes with the FilmMatch Analyzer, giving you the tools to measure, create, and load your very own custom profiles directly into the plug-in.
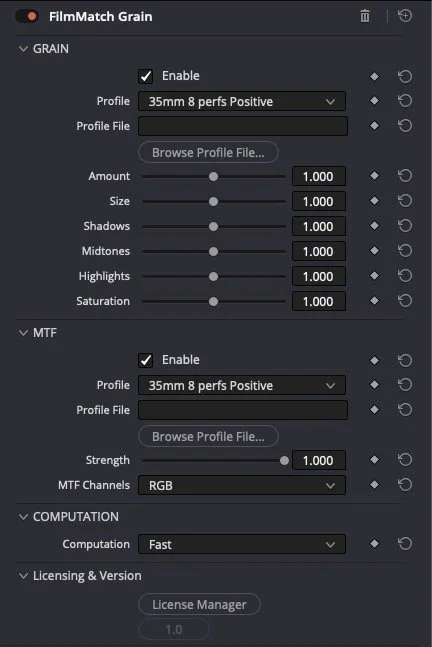
First, the Grain Analyzer evaluates a grain across a matrix of different exposures and colors. During procedural generation, the plug-in uses this data to determine exactly how the grain should behave on specific elements like a blue sky, a skin tone, or a green leaf, rather than simply masking intensity across shadows, midtones, and highlights based on luminance alone.
Second, the MTF Analyzer measures the Modulation Transfer Function (sharpness) of digital source and matches it to the target film stock or photochemical workflow.
During playback, FilmMatch Grain applies both profiles sequentially. The digital image is first processed through the matching MTF curve, ensuring the resolving power of the digital sensor perfectly matches the optical system of the film profile. Only after this frequency matching is complete is the film grain procedurally generated. Because the grain generation is driven directly by the color and density of the pre-matched image, the resulting texture becomes an intrinsic part of the footage rather than a superficial digital overlay.
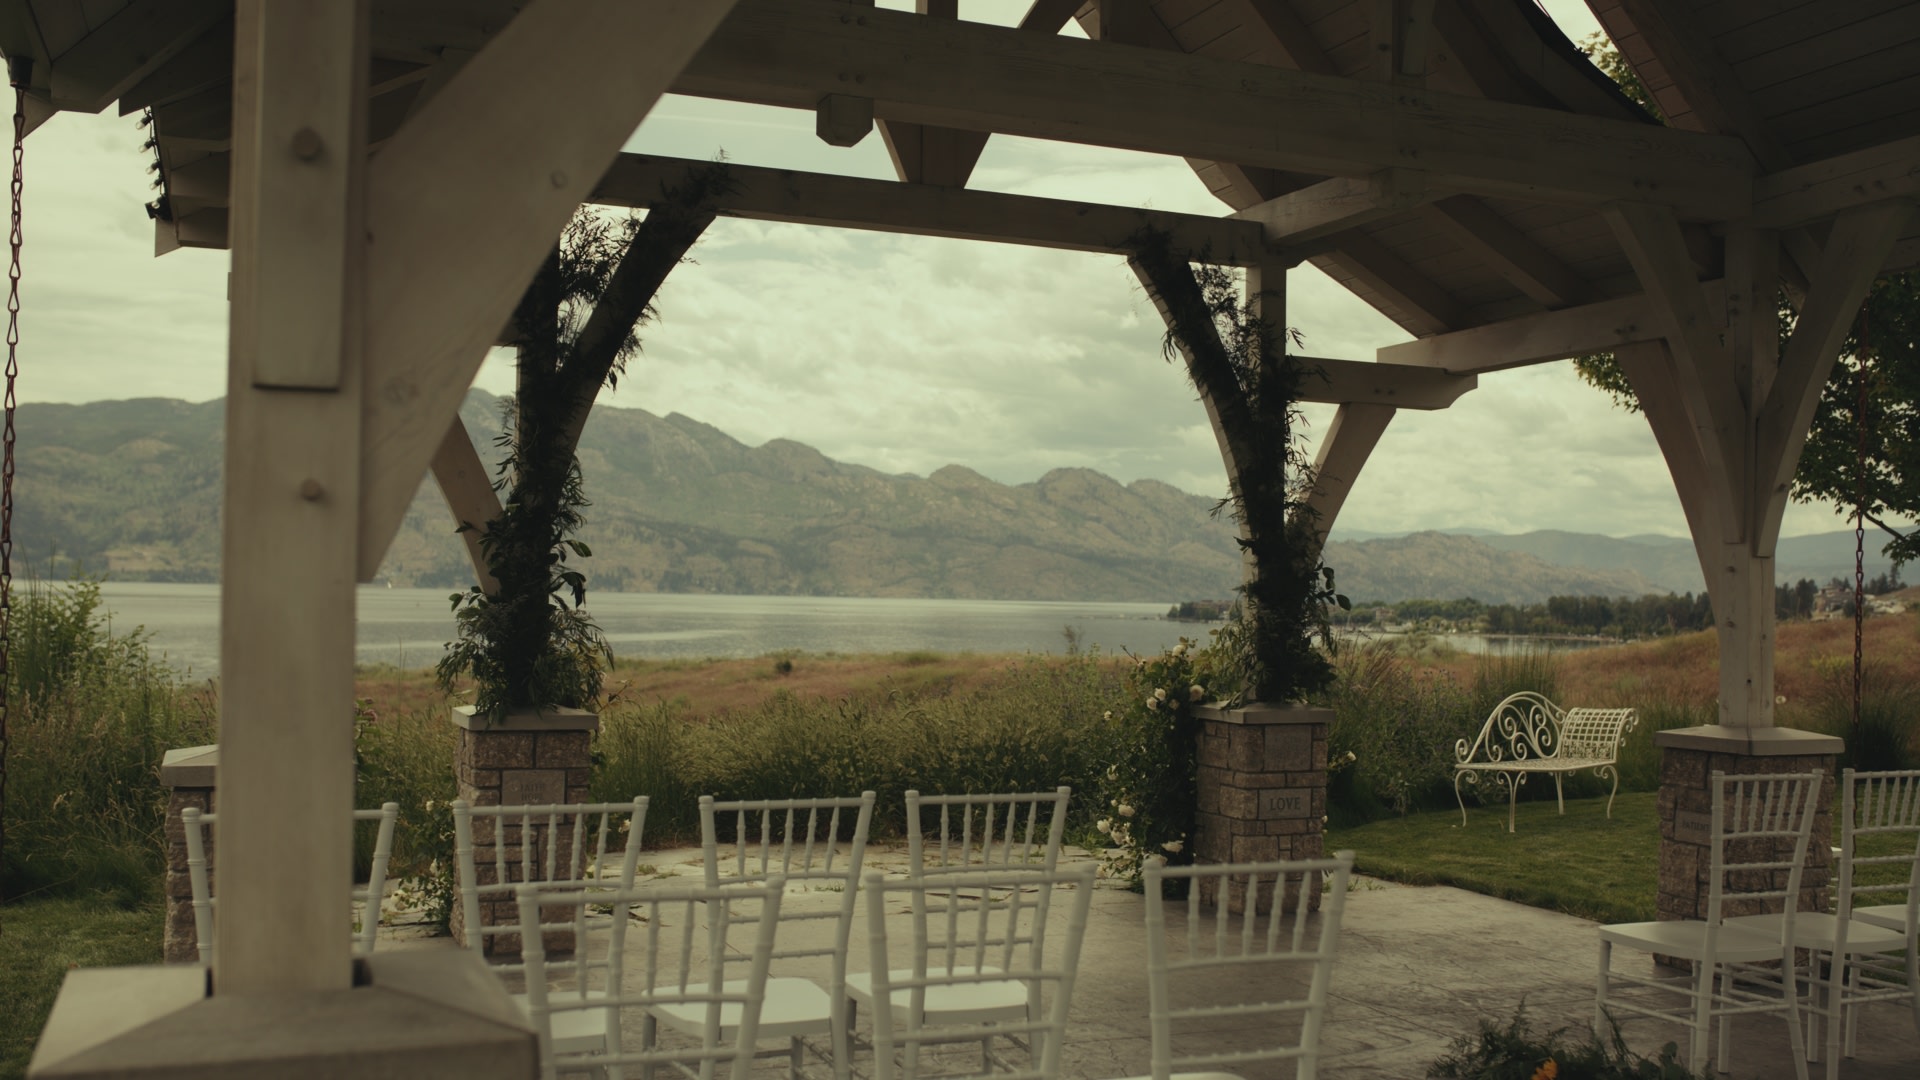
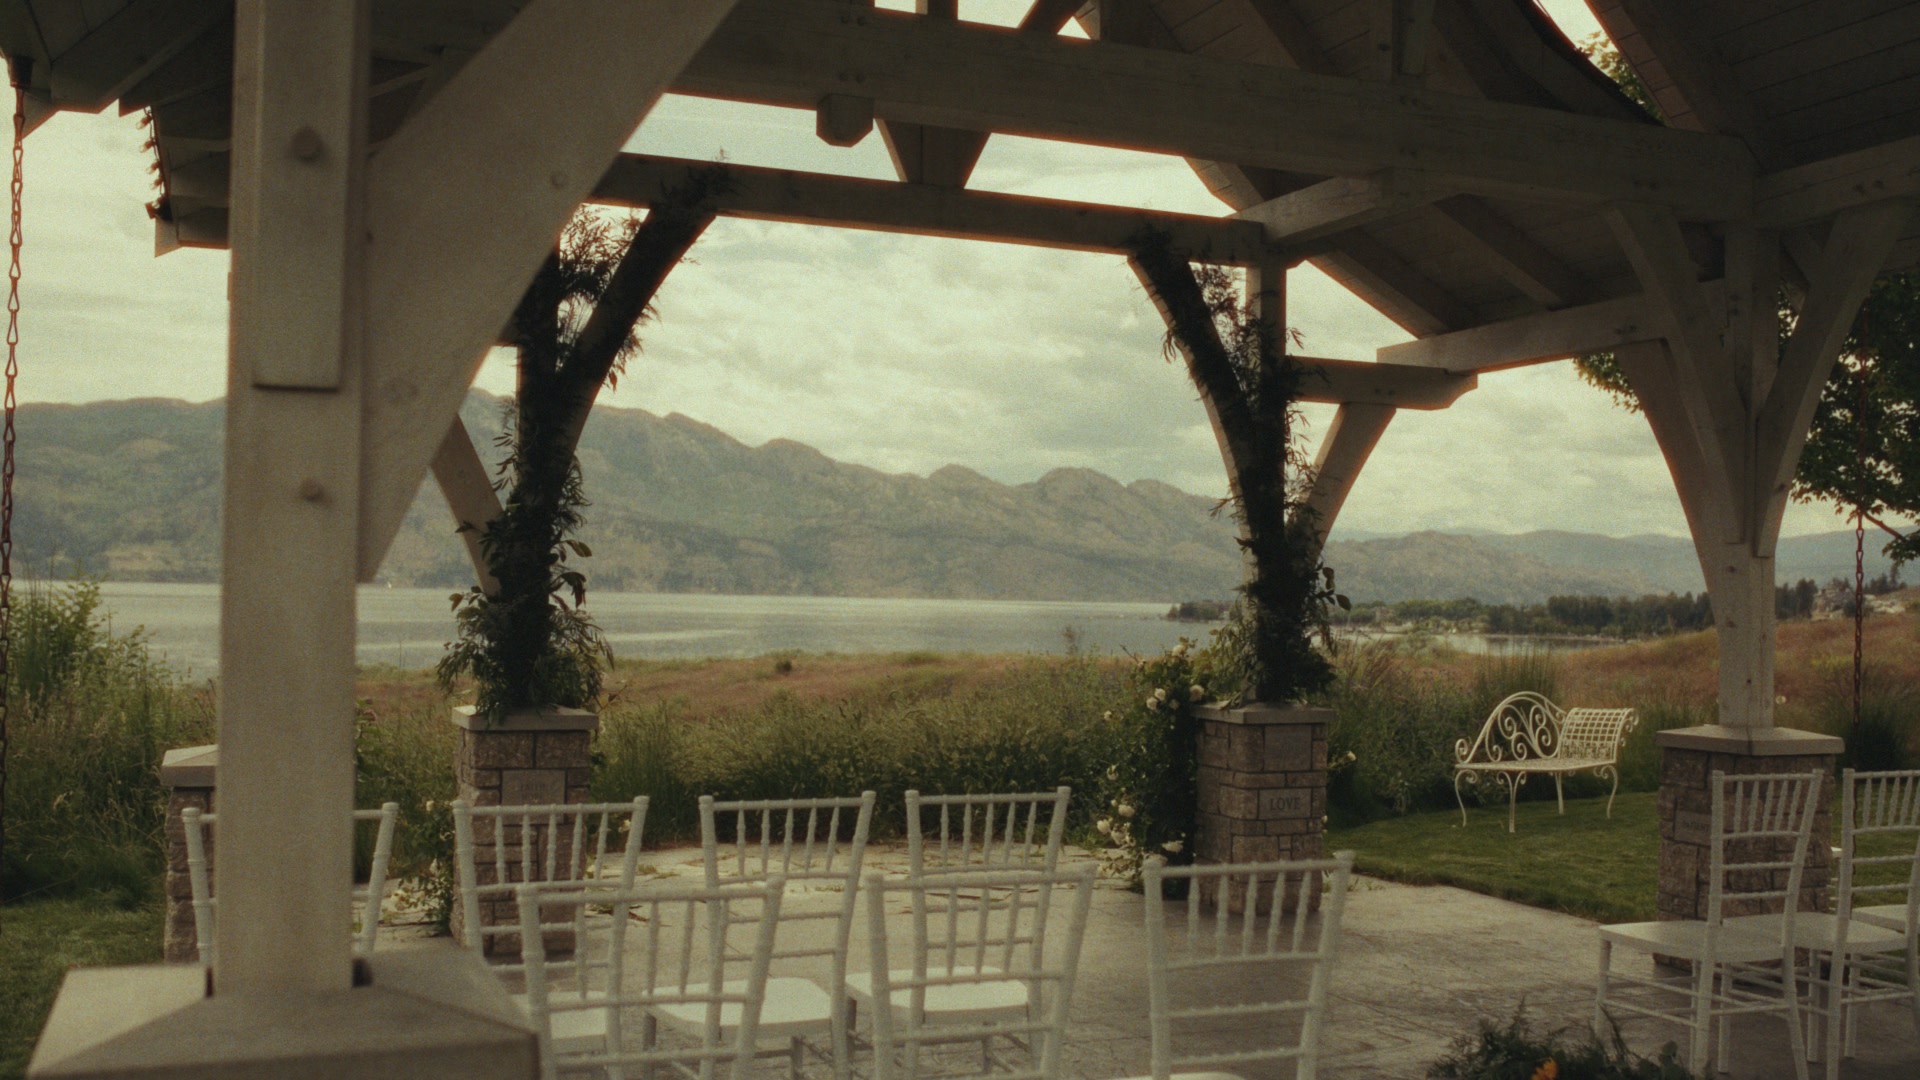
As a cherry on top: FilmMatch Texture OFXs Suite also includes a physically accurate Halation OFX.
Clean
FilmMatch Halation OFX
FilmMatch Halation OFX is a physically accurate halation plug-in designed to recreate the way halation actually happens inside motion picture film.
Instead of simulating halation as a red glow or a blurred highlight layer, FilmMatch Halation OFX models halation as a secondary exposure event. In real film, strong light can pass through the emulsion, reach the anti-halation backing or undercoat, and scatter back into the image-forming layers. This returning light exposes the film a second time, creating the warm red/orange contamination we recognize as halation.
FilmMatch Halation OFX is built around that physical process.
With FilmMatch Halation OFX the original image stays sharp. Only intense scene-linear highlight energy is allowed to generate halation. That energy is then scattered into nearby pixels with a natural falloff and added back as a warm red/orange exposure, recreating the way light behaves when it travels through film, reflects behind the emulsion, and exposes the image-forming layers from the back. But that’s not all!
Most digital halation effects focus on the obvious part: the red edge around bright highlights. But real film halation is not only an edge. When light scatters or reflects behind the film emulsion, it does not only create a thin red outline. It can also softly re-expose the surrounding area, creating a warm fill of secondary exposure around and under bright sources. This subtle contamination is a big part of why real film halation feels rich, organic, and photographic.That is why this plug-in includes Fill. Fill controls the part of halation that many digital tools miss: the soft reflected exposure that fills into the surrounding image, not just the sharp red fringe at the edge. At lower “Fill” values, the effect behaves more like a clean edge halo. At higher Fill values, the halation becomes fuller and more film-like, allowing strong highlights to gently contaminate nearby tones with warmth. This creates a more natural transition between the bright source, the halo, and the image around it.
You can see the effect below, I clearly exaggerated both the halation strength and I set the “fill” parameter to the max value.
Clean
Halation No Fill
Halation with Fill
Take a look at FilmMatch Texture OFXs in action
FilmMatch Analyzer
FilmMatch Analyzer is built not only to create the most organic texture for your digital footage but also for productions that need digital footage to live next to real film. For example, a production may shoot most of a project on 35mm or 16mm film, but still need a few digital shots from a B camera, drone, crash cam. Normally, matching those shots means trying to eyeball grain, sharpness, softness, and texture until the digital image feels close enough. FilmMatch Analyzer makes that process measurable. Instead of guessing, you can analyze the actual film scan and build custom profiles from it. The Grain tab lets you sample real grain from your film material and export a custom grain profile. The MTF tab lets you measure the sharpness response of your digital source and your film target, then create a source-to-target MTF match. That means the digital shot can be prepared with the same texture foundation as the film footage: matched sharpness first, then measured grain.
You can find the FilmMatch Analyzer Interactive User Guide here: https://filmmatch-analyzer-guide.pages.dev
PRICING
- 3-day free trial
- Full access to all functions
- Cancel anytime before the trial ends
- 2 Seats per license
- 3-day free trial
- Full access to all functions
- Cancel anytime before the trial ends
- 2 Seats per license
- No recurring fees
- Lifetime license
- Full access to all functions
- 2 Seats per license
FAQ
Which Operating Systems are supported?
The DaVinci Resolve plug-ins require an Apple Silicon Mac running macOS 14.5 or later, with DaVinci Resolve Studio. FilmMatch Analyzer also requires Apple Silicon Mac running macOS 14.5 or later
What’s included with the download?
With the download you’ll to get FilmMatch Grain and FilmMatch Halation OFXs, FilmMatch Analyzer to create you own profiles (FilmMatch Analyzer doesn't require a license), FilmMatch license manager (required to install and run the license) and the .pfd guides for the OFXs and FilmMatch Analyzer
Why 2 separate OFX’s instead of combining them all in one?
Flexibility. The Halation plug-in requires the image to be either in a log or linear state. Therefore it best to be applied at the beginning of the pipeline. Grain OFX, based on the profile, should be applied either in the middle or at the end of the chain. If the grain and MTF profiles come from a Negative, it should be applied after a negative emulation LUT, before the print (output transform). If the profile is from a positive the effect should be applied at the end of the chain. By keeping the effects separate the user can have maximum flexibility when it comes to their specific workflow.
Which Grain Profiles are included?
Currently, FilmMatch Grain OFX includes three profiles: a 35mm Print 8-perfs Positive (measured from a physical print), alongside 35mm and 16mm Newson model Black and White Positive profiles. Rather than being scanned from physical film, the two Newson profiles are derived from Newson model renderings. The Newson model is an excellent film grain algorithm, but it is highly resource-intensive as rendering a single 4K frame can take up to 10 seconds. Now, with FilmMatch Grain, you can apply these profiles in real time.
More profiles will be available for download soon. And don't forget: you can always create your own custom profiles using the FilmMatch Analyzer.
Is there a Free Trial?
Yes. both the Monthly and Yearly subscriptions include a fully functional 3 days trial which you can cancel anytime before the trail ends, without being charged.
Is the Perpetual License really a one-time payment?
Yes. The Perpetual License ($189,99) gives you a permanent seat for ColourMatch. There are no recurring fees or forced subscriptions. You own the tool for life, with a 1 year of updates.
How many computers can I use my license on?
Every FilmMatch Texture Suite OFXs license includes two (2) seats. This allows you to stay flexible by having the software activated on two different computers at the same time. You can always deactivate and reactivate licenses to run the plug-ins on a new machine.